
B21 Task Planner helps you do THREE things as easily as possible:
If reading help text isn't your thing, then there's an intro video here.
We want to create soaring tasks in MSFS as simply as possible, e.g. a three-waypoint task could be created with three clicks on a map. The soaring tasks are created as standard '.PLN' MSFS Flight Plans or XCSoar '.TSK' files.
B21 Task Planner has THREE ways to get started with a Flight Plan:
Soaring tasks can have additional information embedded into the MSFS .pln file so the soaring Nav gauges and other addons (e.g. ALBATROSS) can pick up this information. Sticking with the MSFS '.pln' format gives us the maximum compatibility and flexibility with MSFS and other flight planning tools. The soaring parameters need to be passed to the aircraft without corruption by MSFS - these include:
The 'additional' soaring parameters in the flight plan are entirely optional, and the B21 Task Planner can equally produce a valid MSFS flight plan with none of these parameters provided. When the optional parameters are provided, and encoded into the waypoint name, custom soaring gauges in the aircraft (such as the B21 Nav Panel) can pick those parameters out of the name and display the name without the parameters to the pilot in the gauge, i.e. a waypoint called "*Burnt Cabins+2310|6000/1000x800" will be displayed in the cockpit as "Burnt Cabins".


Most of these hints relate to the fact that MSFS ignores much of the information in the Flight Plan, e.g. it will take the airport ICAO code but ignore the other data in the flightplan for that airport (such as name of the airport, and its elevation). MSFS will use what is in its own database rather than accepting what is in the Flight Plan. For intermediate waypoints MSFS will accept the name but completely ignore the altitude in the Flight Plan and generate an estimate of the altitude it thinks the autopilot should be flying at instead.
(1) Always start and end the flightplan with an AIRPORT. For these you will need the ICAO code, and for the departure airport it is possible to specify a launch runway but you will need to look the name for this in MSFS (e.g. "26" or "06L"). Confusingly you cannot label those airports as the START or FINISH of the soaring task because of the way MSFS treats that data. Instead you can create another 'user' waypoint nearby (e.g. at the downwind end of the runway) and flag that as the finish e.g. here.
(2) Generally it is better to have Start and Finish waypoints that are other than the departure and destination airports. They can be in roughly the same location, if that is what is wanted, but zoom in on the map and create an additional waypoint such as "Mifflin Start" rather than using the ICAO code "KRVL".
(3) Task waypoints, even ones which are airports, should be specifed WITHOUT the ICAO code, so they will be stored in the Flight Plan as 'User' waypoints. MSFS does not allow the additional soaring parameters (like max/min heights) relative to airports.
(4) If you want to create a general VFR flightplan, perhaps nothing to do with soaring, you can uncheck the [Soaring Task] checkbox in the top-right of the window and the waypoint menu will be simplified.
(5) Soaring flightplans created with B21 Task Planner can contain additional information that is not normally stored inside an MSFS Flight Plan. The 'trick' used is to add data to the name of the waypoint, e.g. a waypoint named in the Flight Plan as "Burnt Cabins+2340" can be read by the soaring Nav instruments as a waypoint called "Burnt Cabins" at an elevation of 2340 feet. That waypoint will be displayed as "Burnt Cabins" in the soaring instruments, while the Flight Plan remains valid for any use in MSFS (where it will be displayed as "Burnt Cabins+2340"). Note that MSFS is generally ok with elevations for Airports but it ignores elevations in the Flight Plan for intermediate waypoints.
(6) B21 Task Planner remembers your settings from one session to the next (assuming the same browser), this includes the units you've chosen for altitudes and distances, and the map location and zoom.
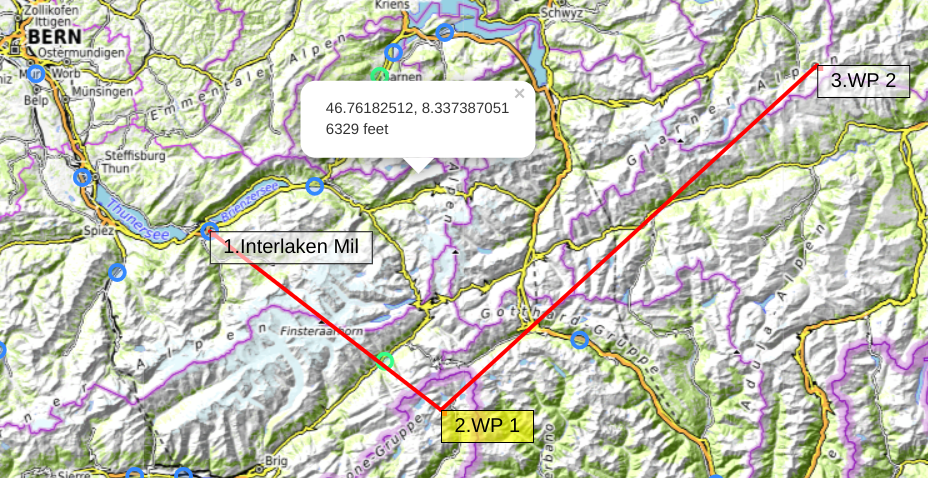
You can quickly see the lat/long and elevation of any point by right-clicking anywhere on the map as shown below:
We'll use an example starting with an existing flightplan as apart from the first step (the 'drop') the use of the program is the same as if you'd clicked on the map to create the waypoints.
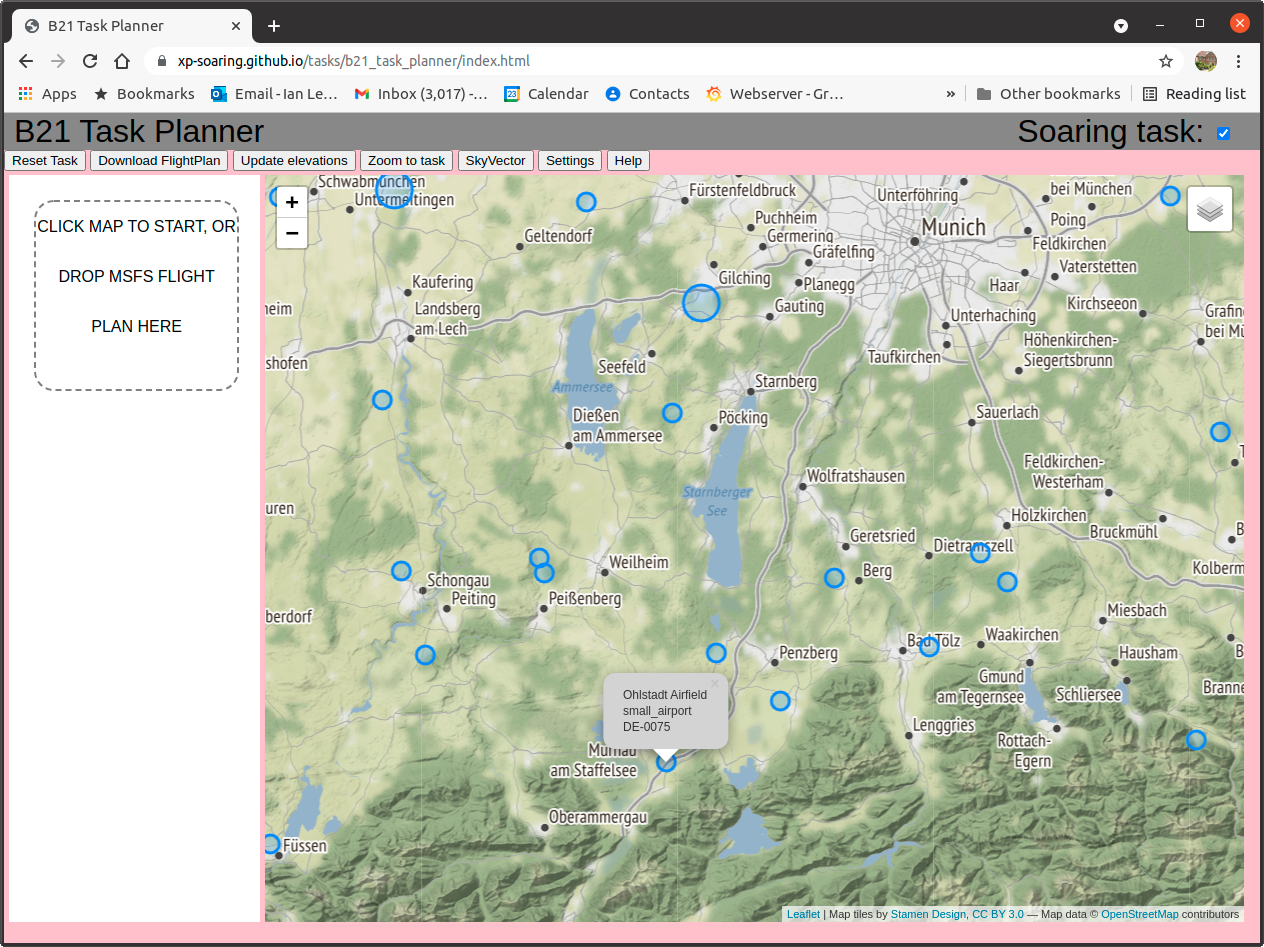
Here's the program (i.e. web page) when you first open it. The map position will be wherever you left it last time you used the program.

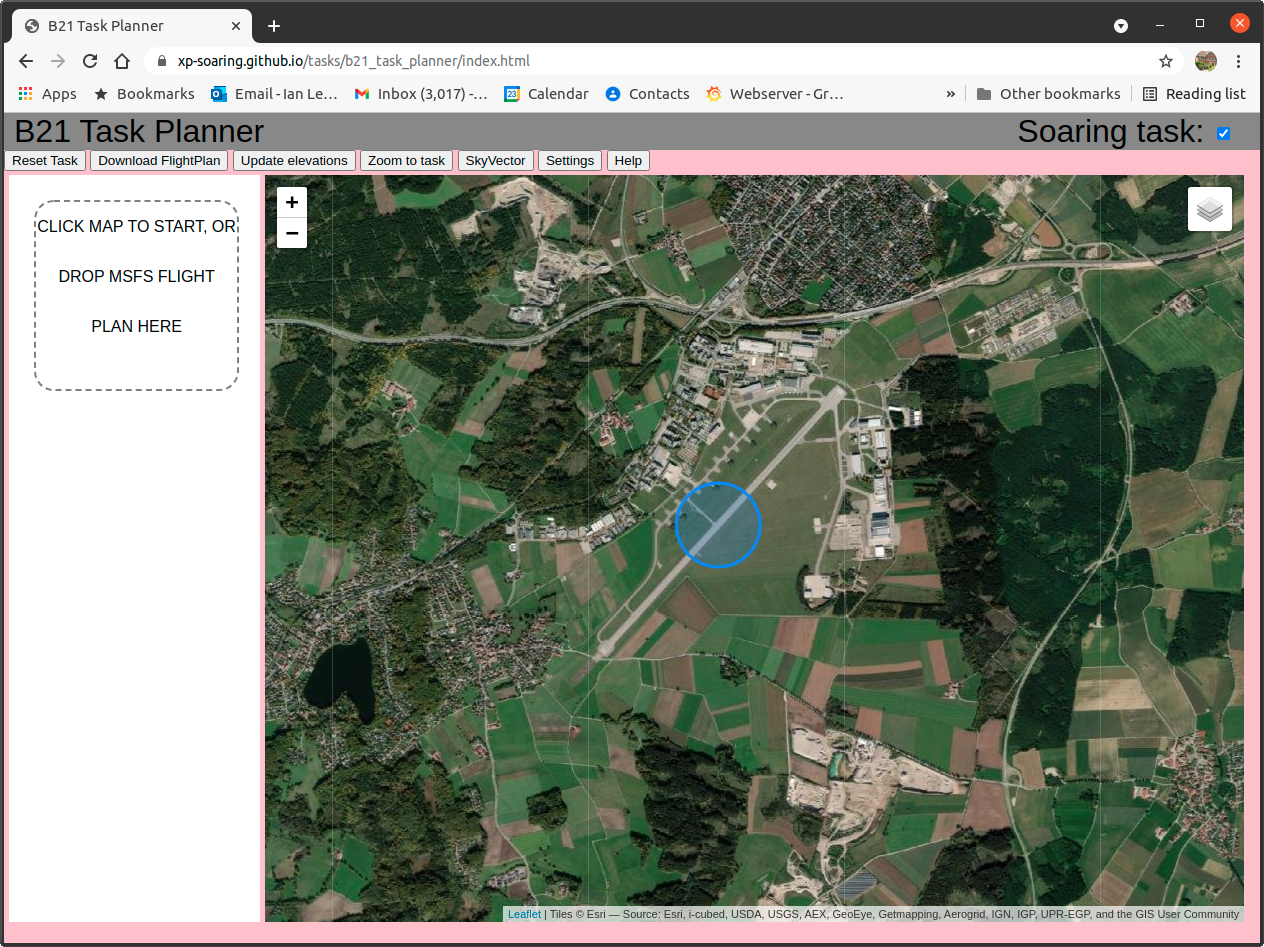
After we 'drag & drop' a flightplan:
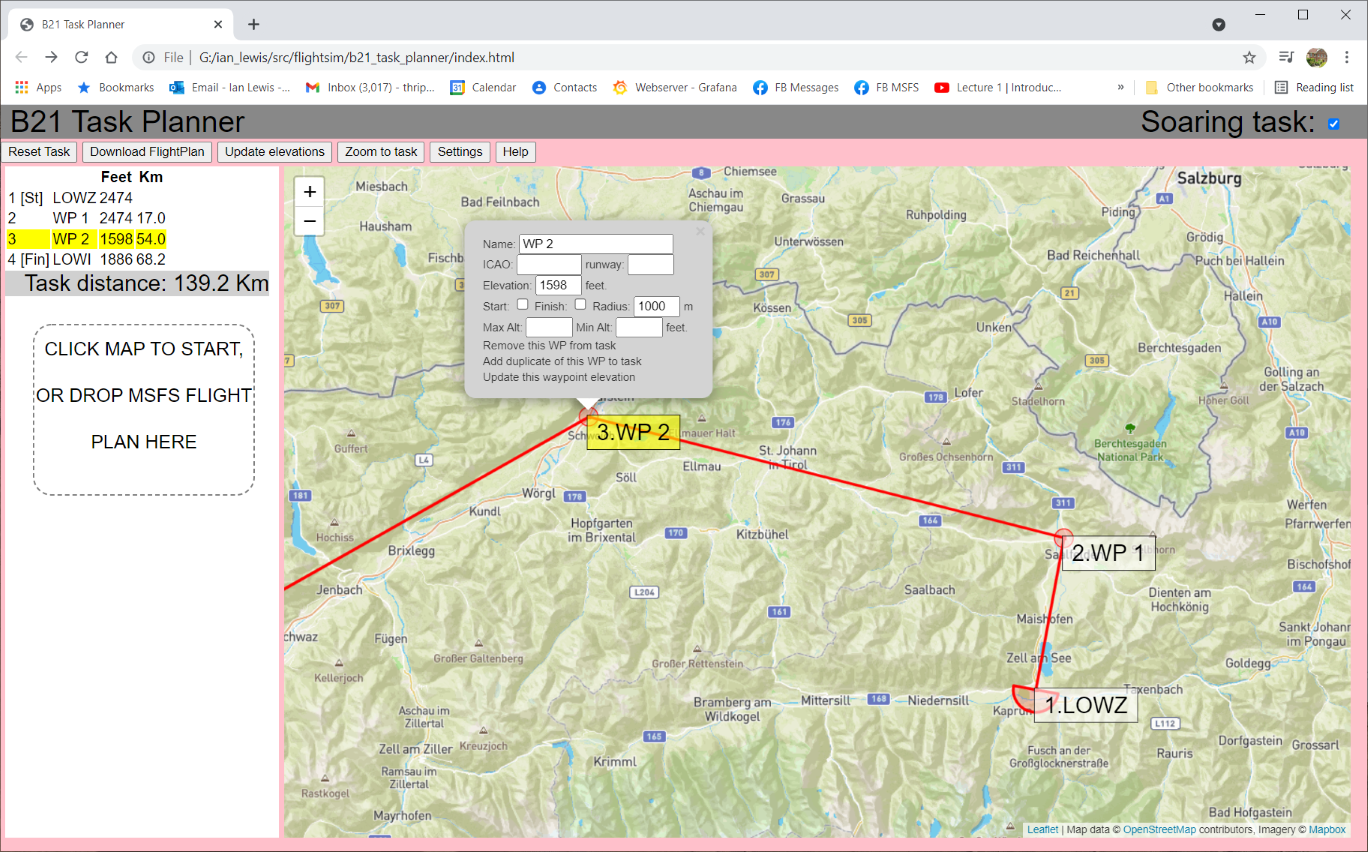
Checking the box to show which waypoint is the task start. We also set a maximum start height:
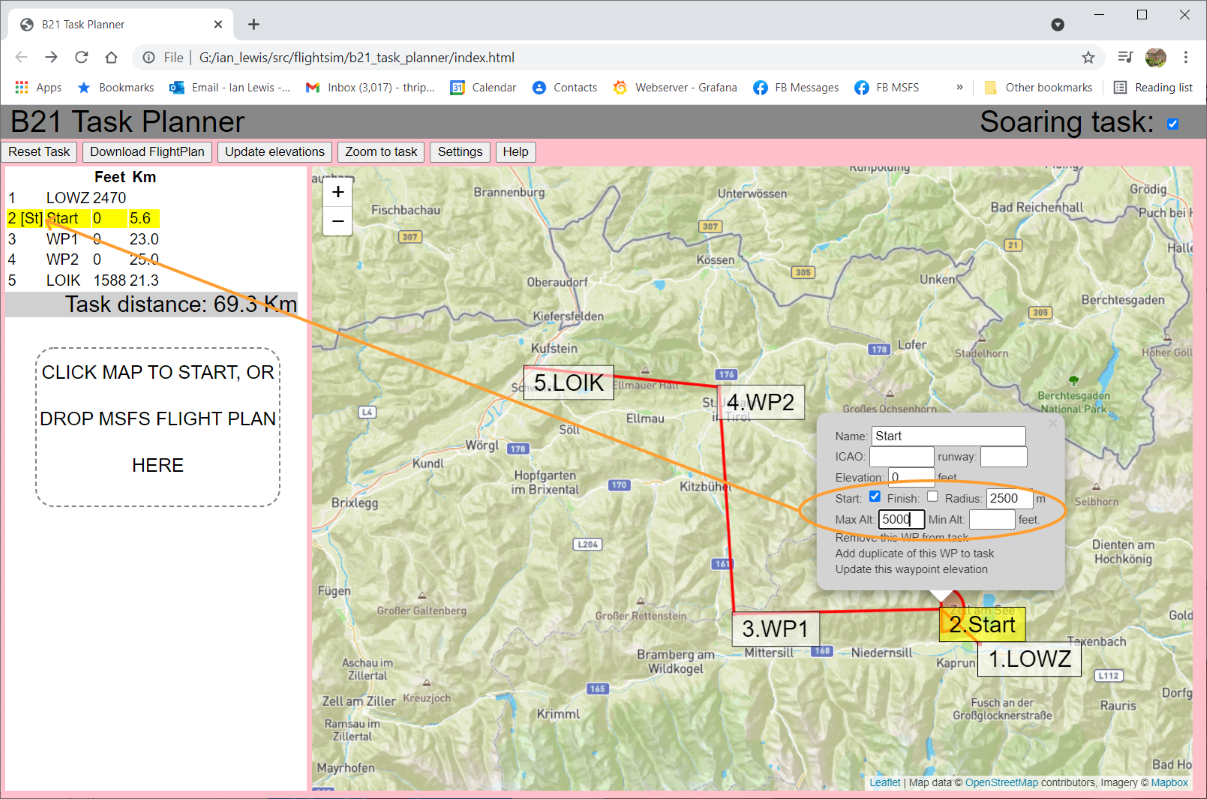
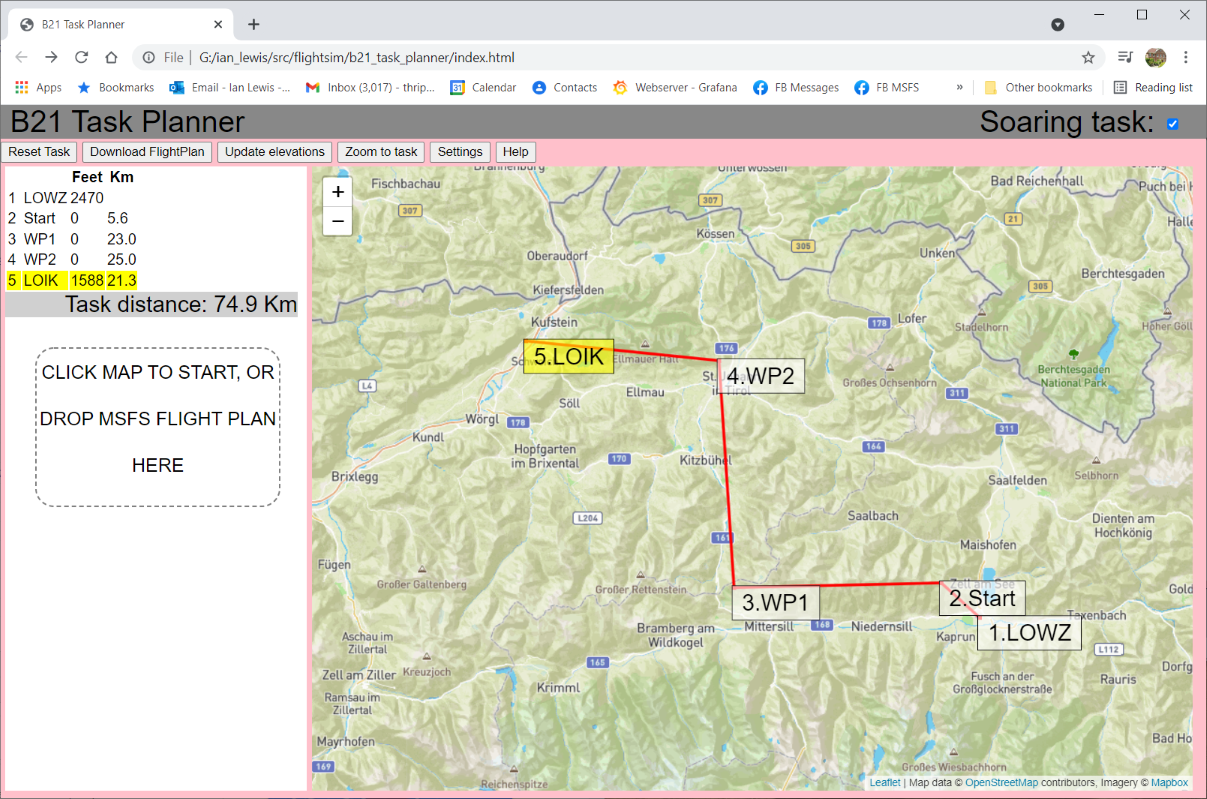
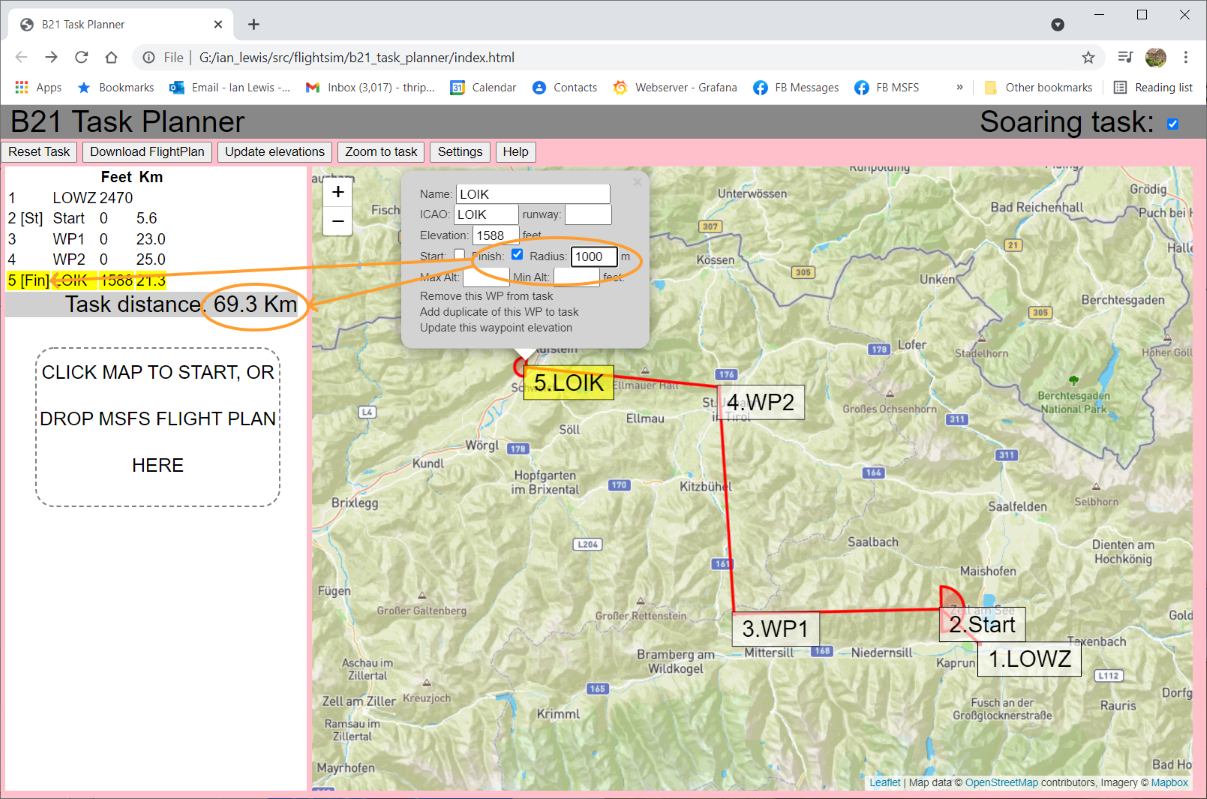
Similarly we can set a checkbox to show which is the FINISH waypoint. Note the task distance is calculated from Start to Finish, ignoring legs before or after those.
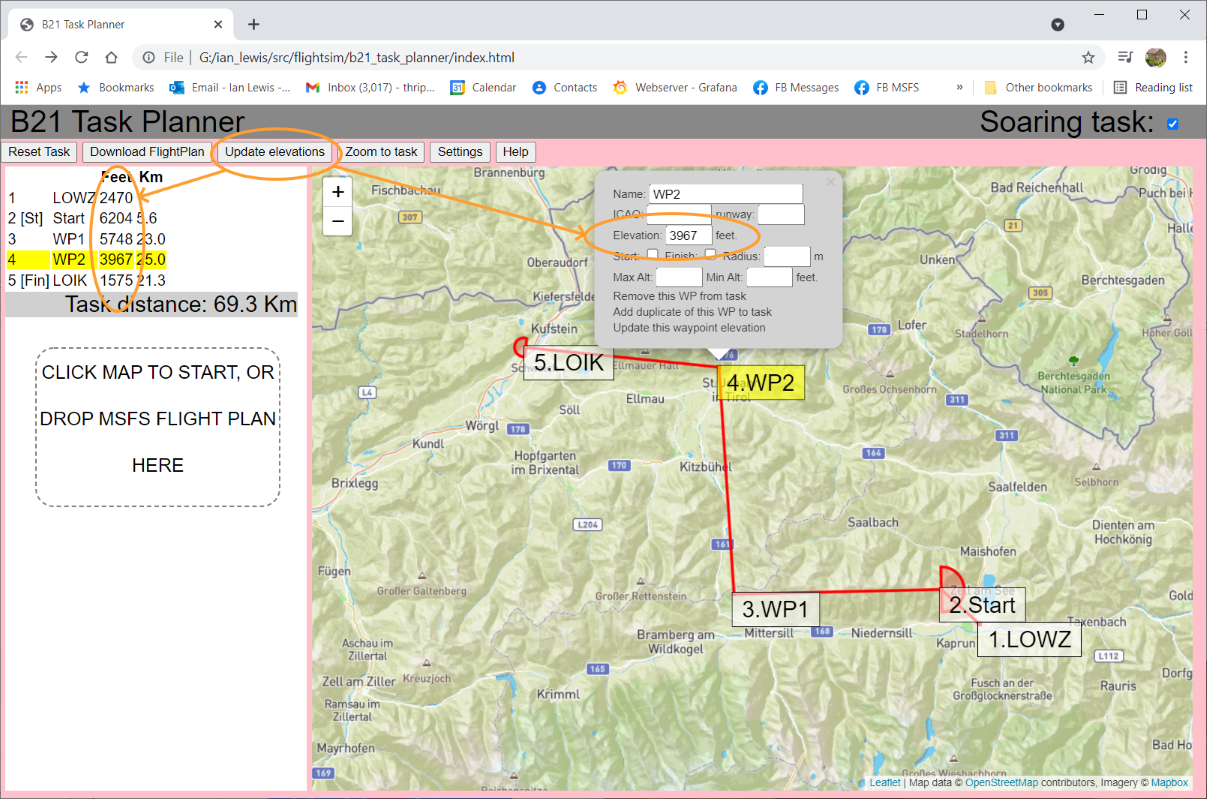
A 'killer' feature of the B21 Task Planner (for soaring tasks) is it can look up the ground elevation for each waypoint an annotate the data in the MSFS Flight Plan with that information. For B21 instruments that display Nav information including Arrival Height, this elevation allows that information to be AGL. You can click the [Update elevations] button which will update the elevations for ALL the waypoints, or for a single waypoint you can click the waypoint "Update this waypoint elevation" option, as illustrated below.
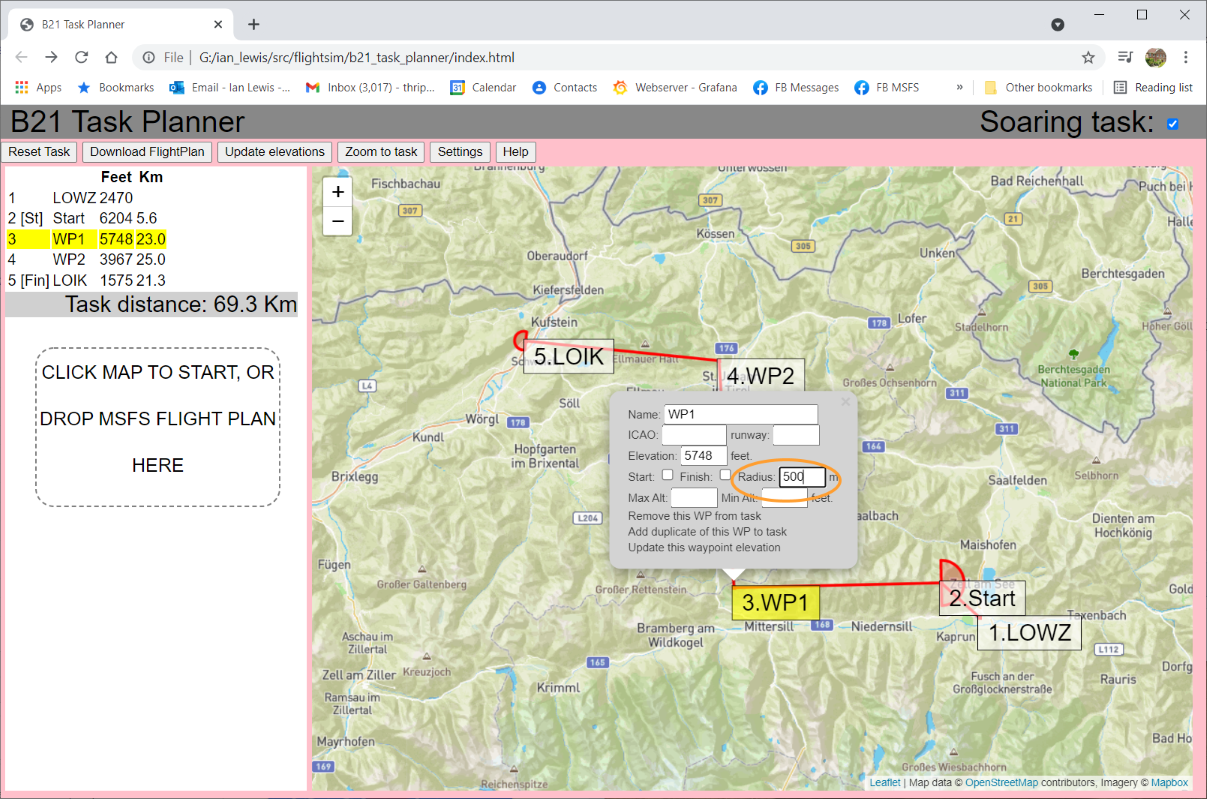
Setting a 'radius' for each turnpoint is also easy via the waypoint pop-up menu:
At this point the task is complete, and can be downloaded by clicking the [Download] button:

The Flight Plan MUST begin and end with an airport, and for these you MUST know the ICAO code to enter into the waypoint data. The B21 Task Planner includes an airports database with ICAO codes but be aware MSFS has its own database so there may be differences. One easy way to find the ICAO code for the airport (e.g. LOWZ for Zell am See airport) is to use the World Map page in MSFS, and that will also give you the runway names if you want to specify one for the departure (you should, so the plane is facing into wind).
If you have an existing Flight Plan containing the airports you're interested in, you can simply drag-and-drop that onto the Drop Zone and those waypoints will be imported.
Here we will click on the existing Zell am See airport displayed on the map, adding the ICAO code. We can also add a departure runway. Note that MSFS will accept cardinal values, e.g. EAST or SOUTHWEST for the runway.

Now is a useful time to add the destination airport - that only takes one click:
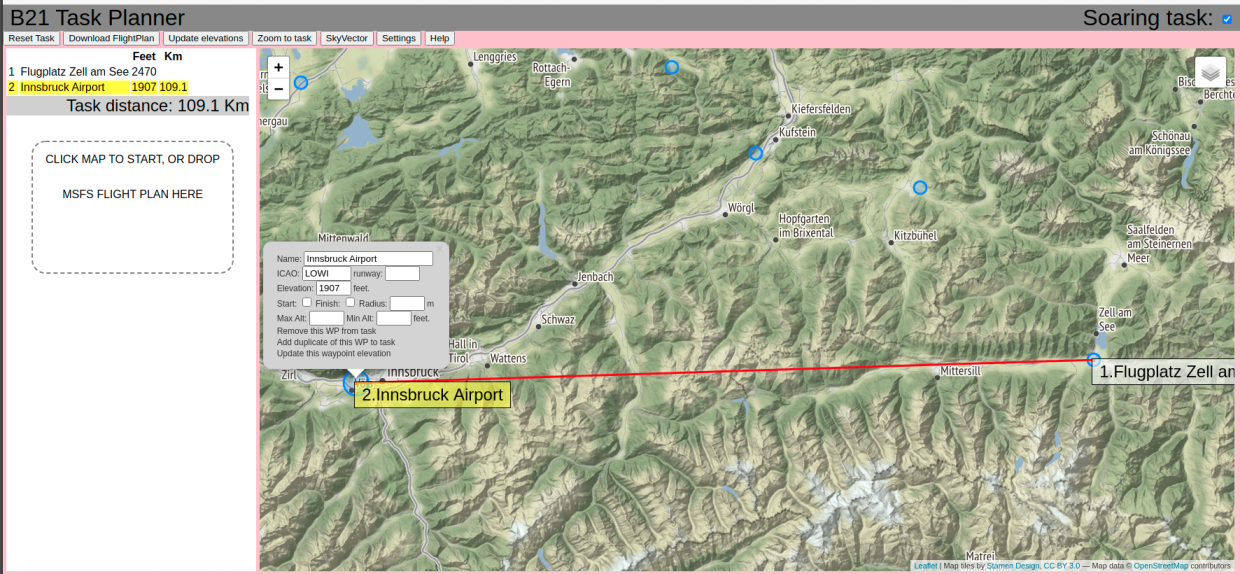
Now if you RESELECT LOWZ (because additional waypoints are always added after the CURRENTLY SELECTED waypoint), you can click on the map and add waypoints between those airports:
Note you can drag the waypoints around which means you can 'draft' a task keeping the map at a fixed scale enabling you to see the whole task, and then you can zoom in on individual waypoints and drag them to the exact point you want them e.g. the downwind end of the runway often makes sense for finish waypoints.
At this point you have pretty much caught up with the example given before with a loaded MSFS Flight Plan, and the editting of waypoint radius, and min/max altitudes is the same.
The B21 Task Planner allows the user to choose the units they want to input/see for altitude (meters or feet) and distance (kilometers or miles). However, when these values are encoded into the MSFS flight plan WP name, altitude/elevation will be in feet MSL and distances will be in meters.
The [SkyVector] button will open a new tab in your browser, with the SkyVector map lined up the same as the map within B21 Task Planner.
So first navigate to the airport of interest on the map in B21 Task Planner, the example below shows Blairstown NJ - you'll notice the Task Planner database includes Blairstown so at this point you could click on it and this exercise would be complete, but let's continue with the SkyVector exercise...

Then click the [SkyVector] button. A new tab opens, and you can see Blairstown Airport also centered on the SkyVector map with the ICAO code (1N7) shown next to the airport name:
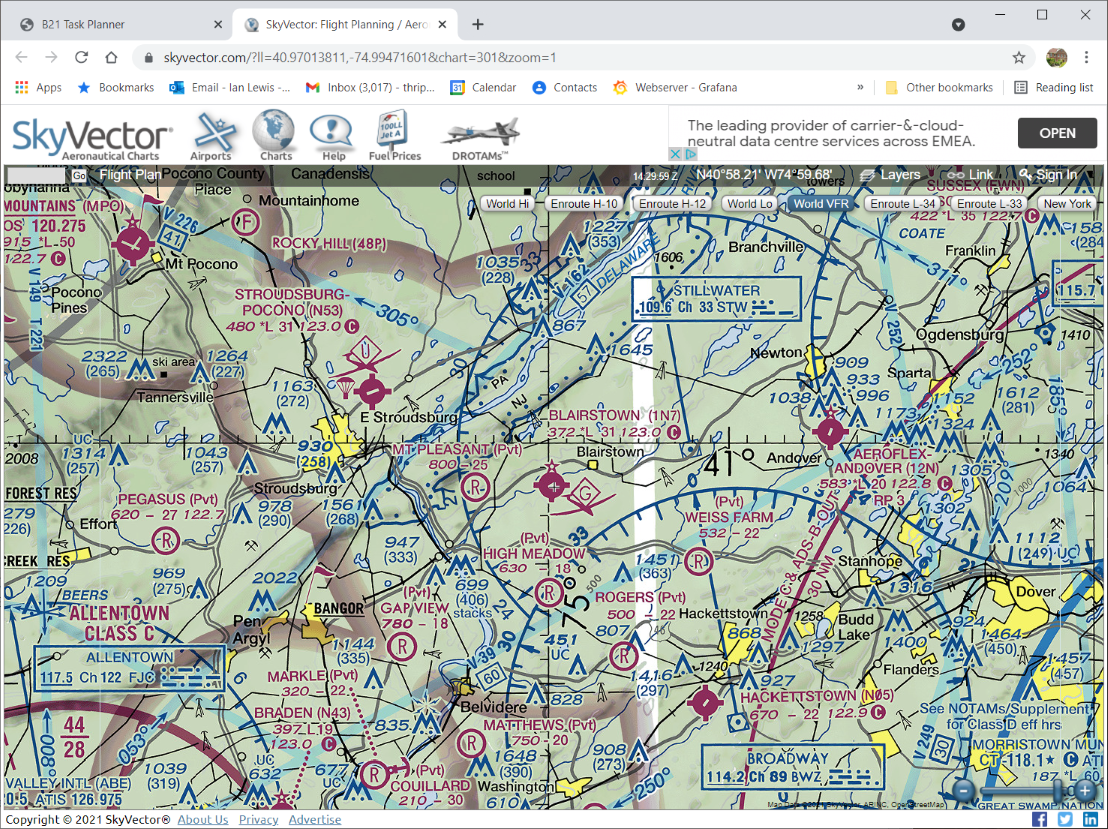
Given the "1N7" code for Blairstown Airport, you can click the SkyVector [Airports] button, put "1N7" (or Blairstown) into the search box, and you will get the Airport information page including the runways "07" and "25" (top-left of page):

You load a tracklog the same as you do for the flightplans... just drag-and-drop a .IGC or .GPX file onto the Drop Zone. If more convenient, you can use the "Choose Files" button in the Drop Zone.
A new 'tab' section will appear on the left side of the window ("Task Info", "Tracklogs").
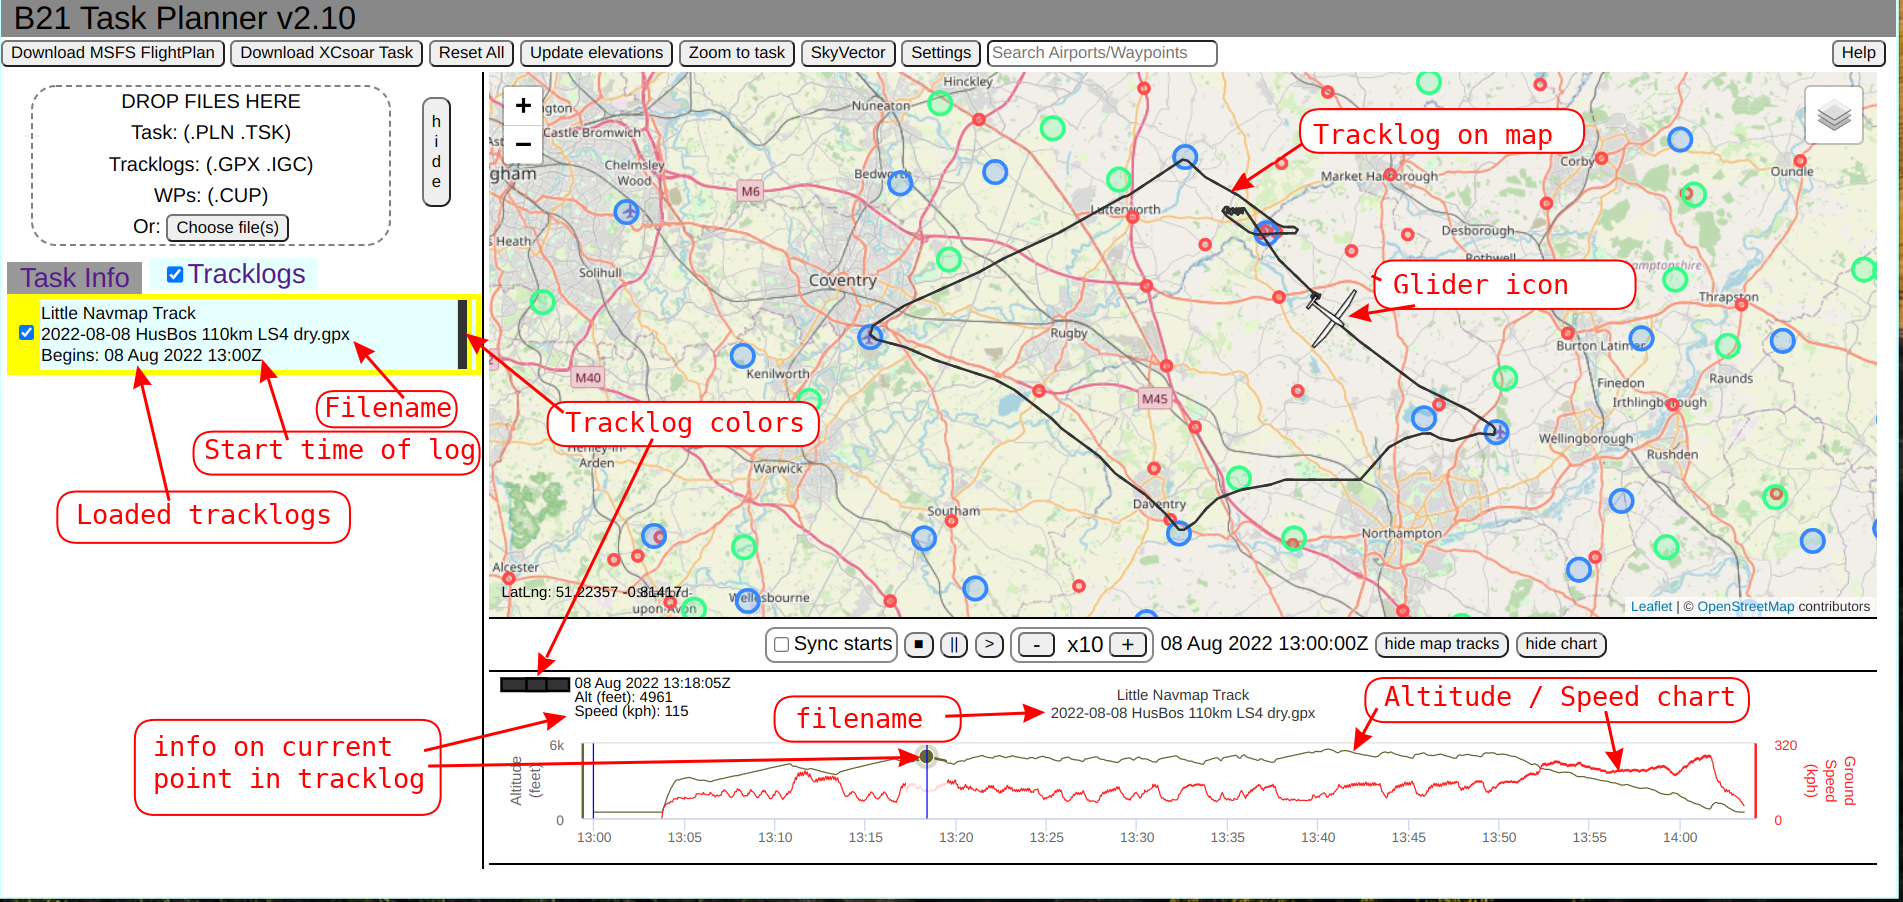
You can inspect any part of the tracklog simply by hovering the mouse over the chart. This will calculate the tracklog point underneath the mouse and display the current information in the top-left area of the chart.

Here we have zoomed the map to a part of the flight we're interested in and then dragged the mouse across a section of the tracklog in the chart. The chart 'zooms' to show just that section of the tracklog and the top-right of the chart area shows calculated values just for this selected section. Clicking the "Reset zoom" button on the chart will return to the full chart.
The analysis data is calculated from the first and last tracklog points in the selected section:
The climb rate is useful to glider pilots in assessing their thermalling performance.
If the height gain is NEGATIVE, then instead of "Climb (knots) 3.0" the chart will display the GLIDE RATIO for the height loss over the straight-line distance, e.g. "Glide 42:1". This is only useful for soaring pilots IF they have purposely flown at a fixed airspeed in a straight line with nil wind over an extended distance. In this case the analysis is extremely useful in assessing the glide performance of the aircraft.
This example shows the flightplan being loaded that was used during the flight that generated the tracklog above.

A tracklog and a flightplan can be loaded in any order and the Planner will then 'score' the tracklog against that flightplan. To complete the task, the tracklog must pass through the start, finish and each ofthe waypoints. The Planner will check the tracklog against the specified boundaries of the waypoints (such as radius and altitude limits) and if completed a task completion speed will be calculated.
As in the image below, if the tracklog is clicked on the "Tracklogs" tab, an "Info" panel will open showing the details of the flight performance at each waypoint.

This example uses the same tracklog and task as above but with the "Coventry" waypoint moved a little so the current tracklog fails to pass through that waypoint (i.e. within the required radius).
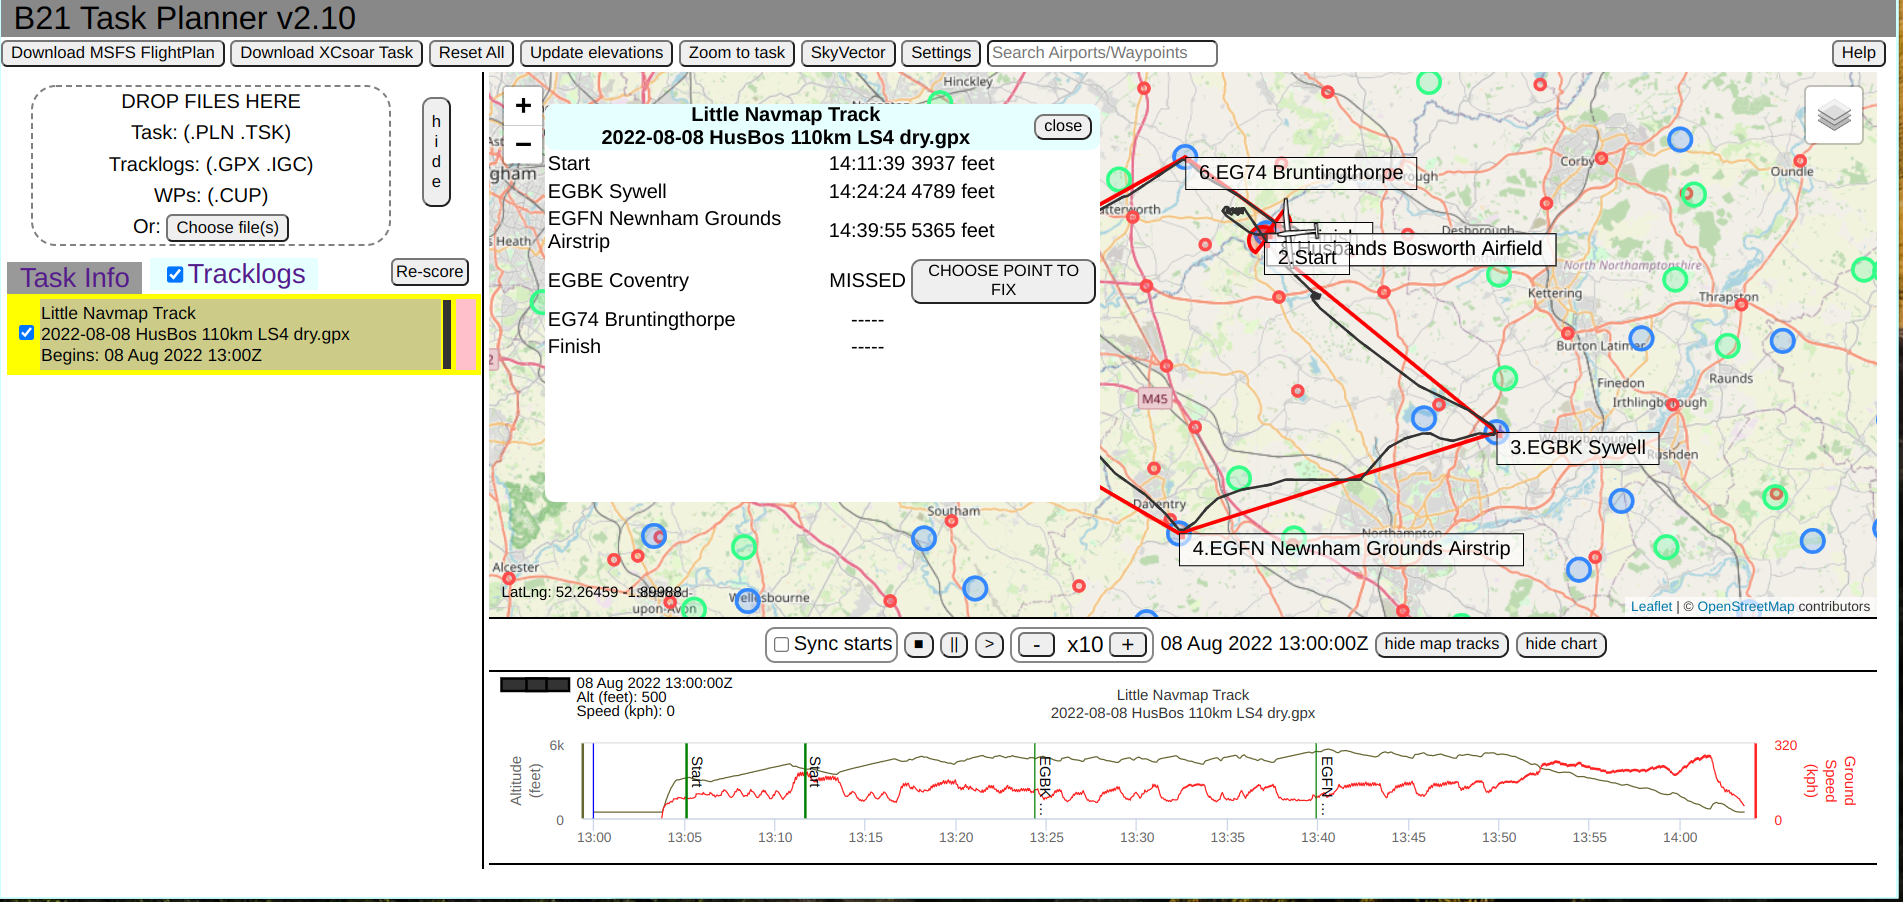
The "Tracklog Info" panel shows the Coventry waypoints was missed so at this point that task is 'incomplete' and a completion speed is not available. In a real soaring competition the pilot would have penalty points applied for closely missing the waypoint, and the completion speed would still be calculated.
The Planner allows the completion time to be calculated by allowing the manual selection of a tracklog point to be deemed to be acceptable for completion of the missed waypoint. In a sim-soaring competition there could be similar calculation of 'penalty points'.
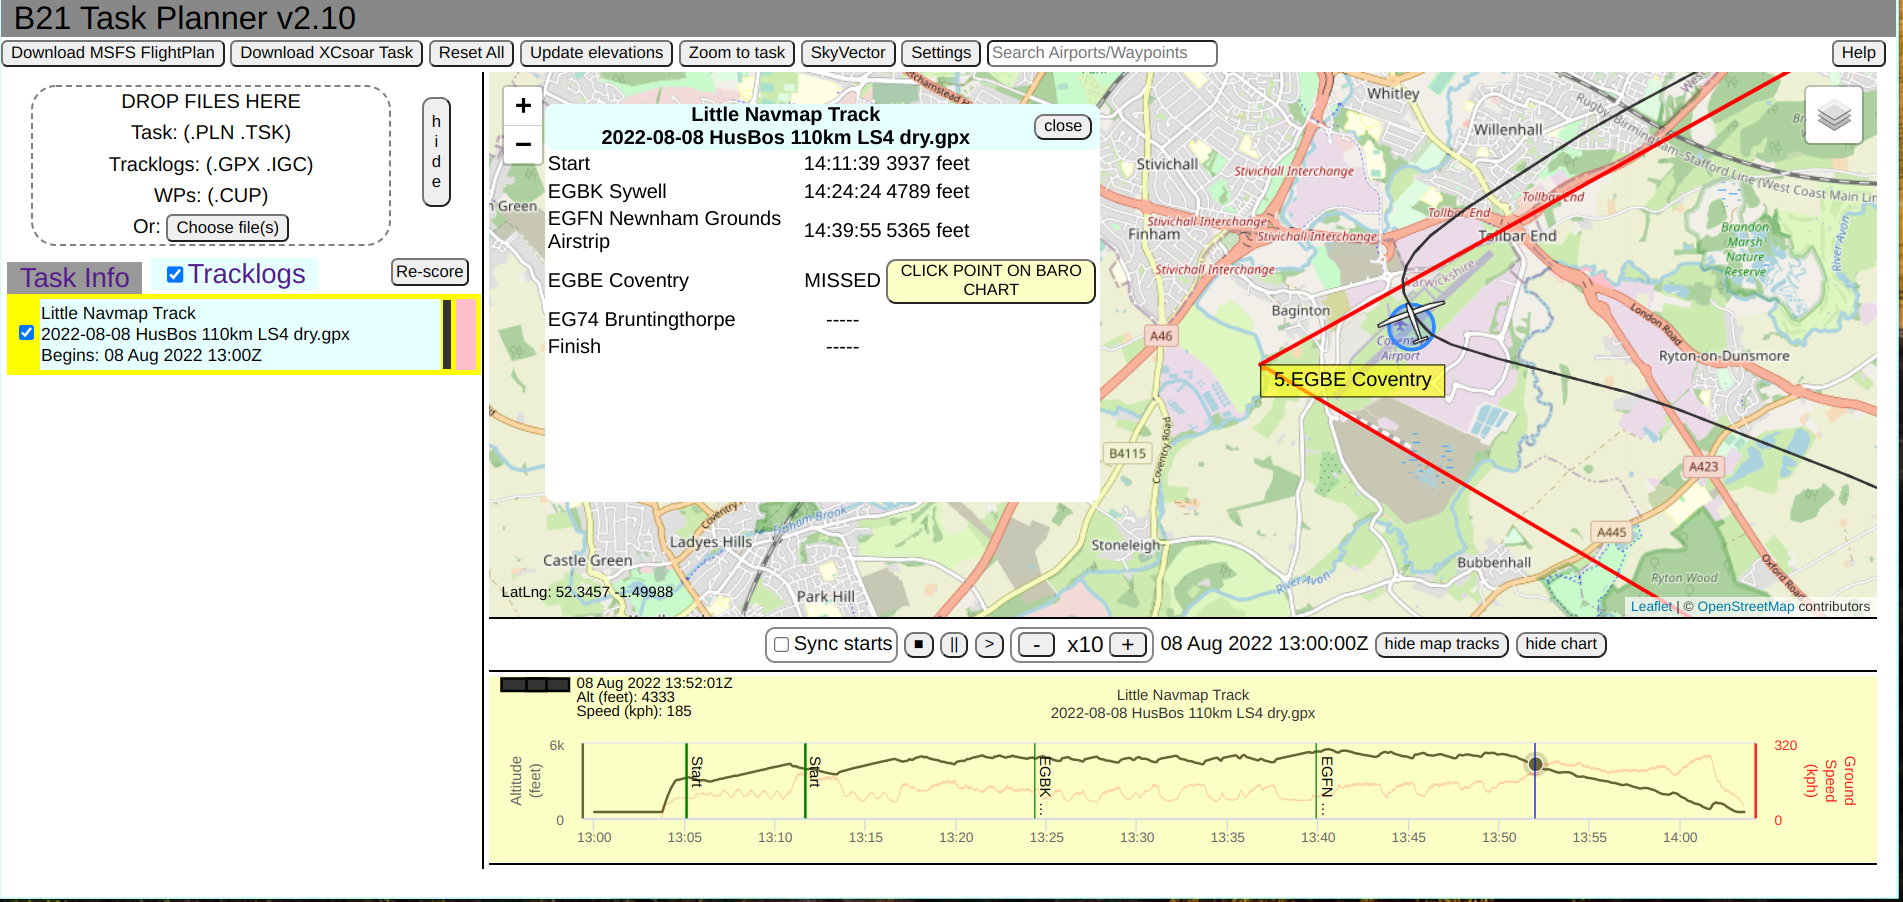
In the image above, we have zoomed the map into the area of the turnpoint and clicked the previous "Choose Point to Fix" button. The button and the chart become highlighted, so now we should hover the mouse over the chart points until we click on one that seems most appropriate to use for the current waypoint. The glider icon will move on the map as we move the mouse over the chart.

On clicking the chosen point in the chart, the tracklog gets re-scored and the "Tracklog Info" panel shows a successful completion of the task.
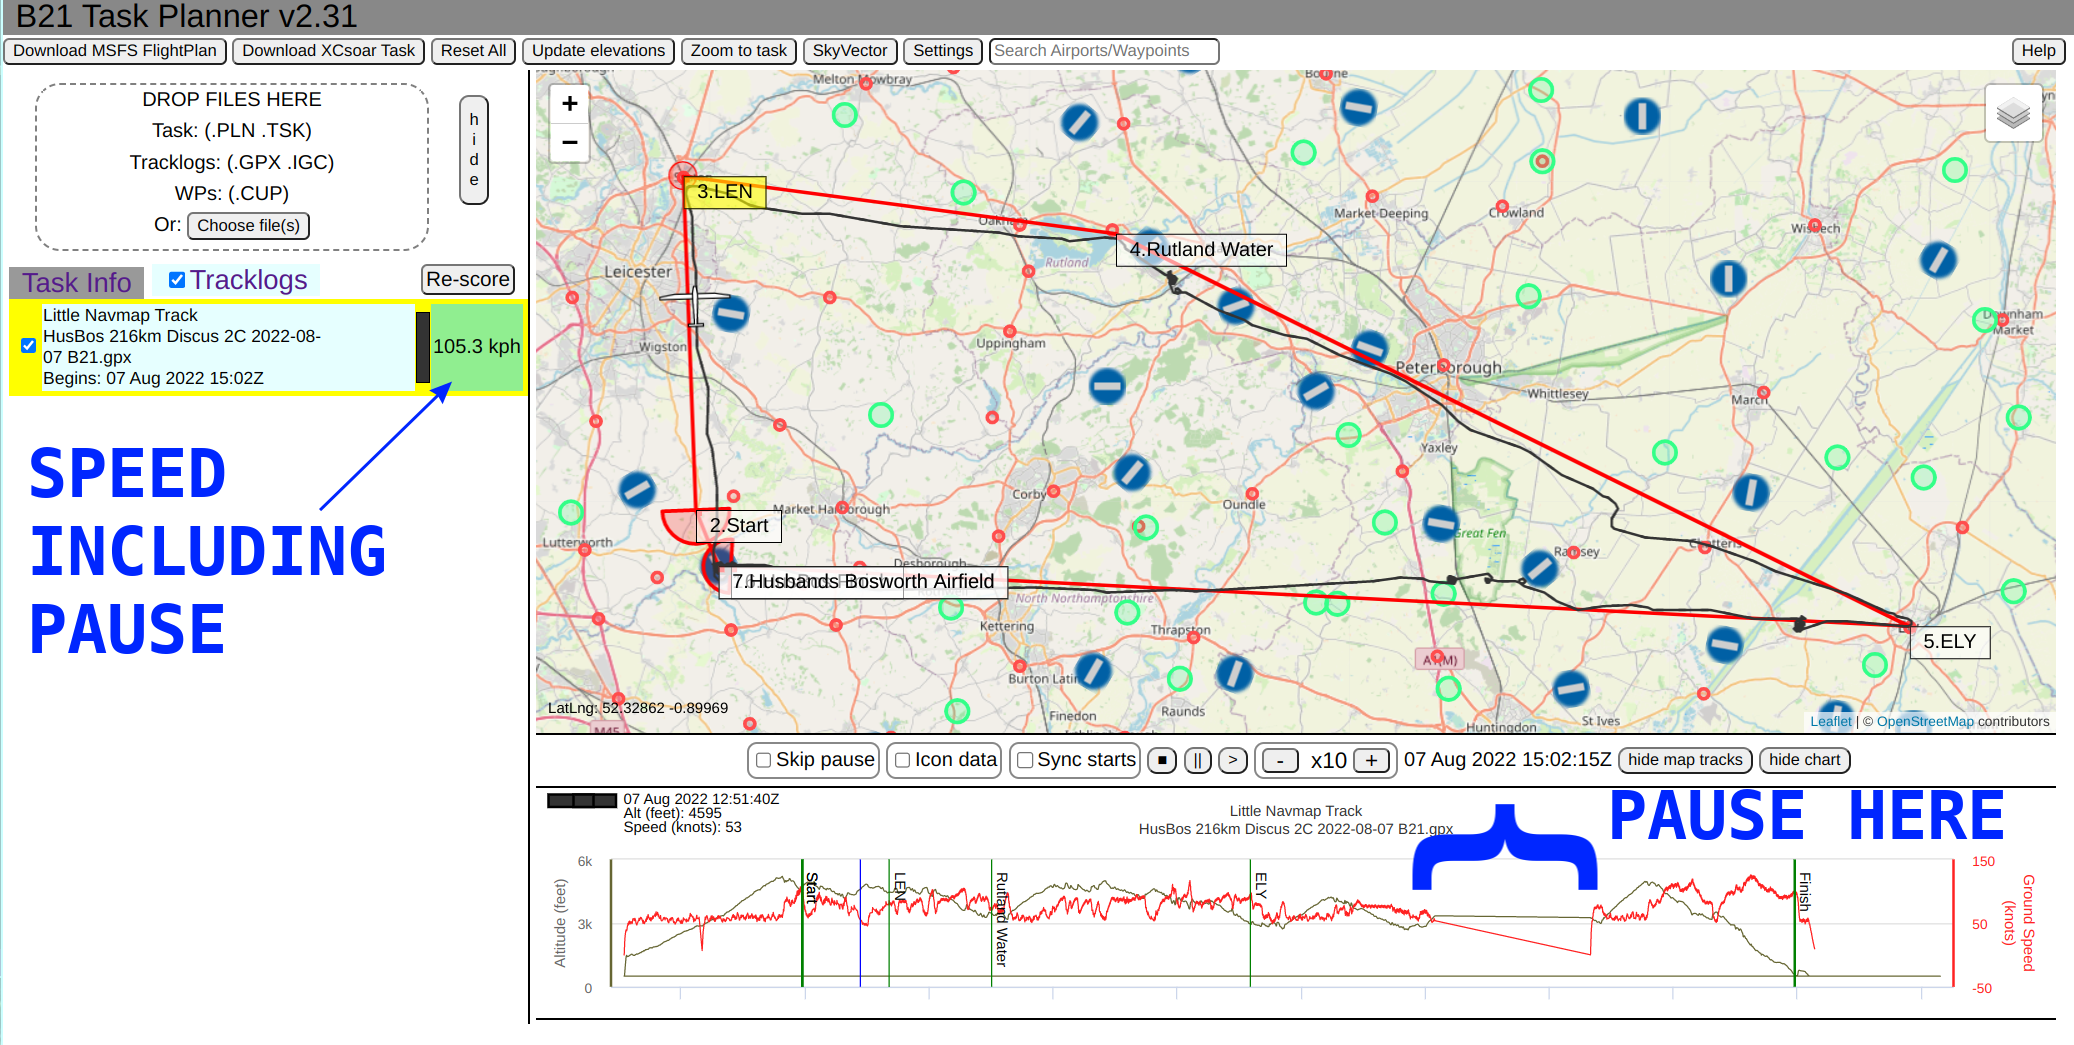
It should be considered normal for a Sim pilot to "pause" the flight (e.g. hit the "Esc" key during the flight) due to whatever domestic disturbance needs to be handled. In MSFS the sim "clock" will continue to run, but the position of the plane will be frozen.
B21 Task Planner can automatically scan the loaded tracklogs, detect where the sim pilot has paused the sim, and 'correct' the tracklog as if the pause had never occurred. A minimum threshold of 15 seconds for the pause is set to avoid situations where the logger used simply briefly skipped a few points. In other words if a sim pilot DOES pause the sim for 10 seconds, then he/she will have to suck that up and accept being 10 seconds slower than they otherwise would have been.
The image below illustrates a tracklog containing a pause. The pause is clearly visible on the time/altitude/groundspeed chart but pretty much impossible to spot on the tracklog displayed on the map.
As can be seen below the tracklog contains the pause, and B21 Task Planner is calculating a task completion speed of 105.3 kph including however long was spent with the sim paused. Clearly the task would have been completed more quickly without the pause.
This image below shows the same tracklog, AFTER the "Skip pause" checkbox has been checked. The Task Planner has scanned ALL the loaded tracklogs (in this case only the one shown) and identified and corrected the completion times and speeds for any tracklogs containing pauses. In the example given you can see the completion speed has improved to 124.6 kph.

Removing pauses is great for fairly comparing tracklog completion speeds (unless your task is somehow hardass "no pauses allowed") but also it makes the "maggot racing" replay of multiple tracklogs a better comparison between flights. The "Skip pause" effect is reversible, simply by unchecking the checkbox and the analysis will be redone using the original data.
Removing pauses requires scanning through ALL of the loaded tracklogs point-by-point. It's pretty quick (maybe half-a-second per tracklog) but if you have a large number of large tracklogs loaded then be prepared to wait a few seconds while it completes.
The essential method used in B21 Task Planner is to spot areas in the tracklog where 'jumps' occur in the logging WITHOUT a material distance covered between the otherwise adjacent logpoints, and it fixes up the timestamps so the tracklog becomes sensibly continuous. Typically the tracklog will show a small amount of distance between the points either side of the pause and B21 Task Planner will adjust those points to have an appropriate time separation given the distance travelled. For example, a 30 minute pause might be replaced with a 3-second gap between the logged points either side of that pause.
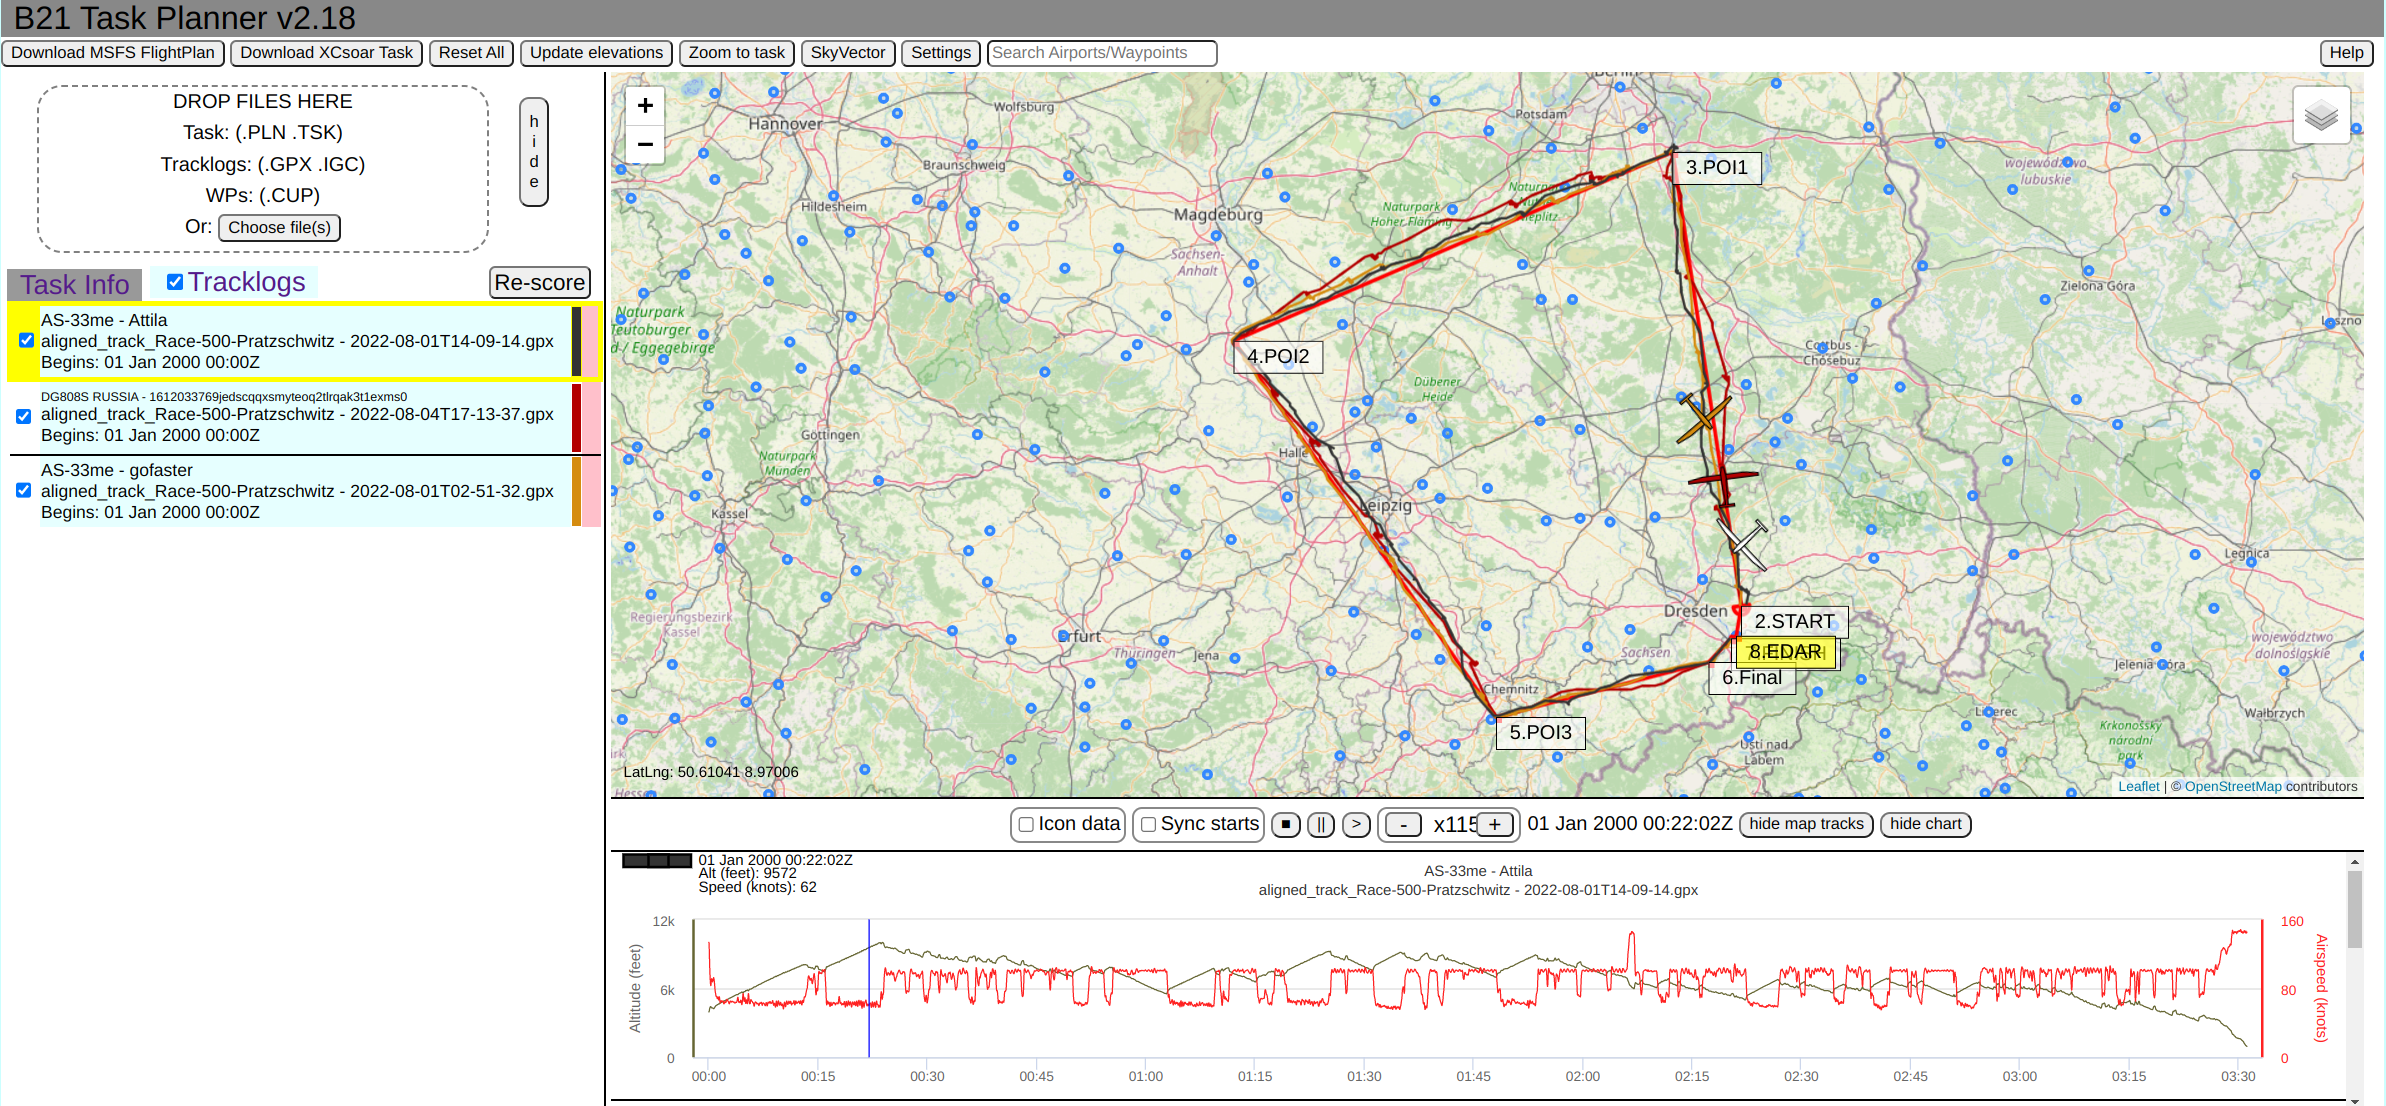
Loading a flightplan and many tracklog files for a 'competition' (i.e. many pilots attempting the same task) is as simple as dragging all those files into the Drop Zone in a single sweep. The screenshot below shows all the REAL tracklogs for the Lasham Regionals Day 4 flights in 2001.
You will see each tracklog on the map is 'color-coded', with those colors matching on the "Tracklogs" list on the left and the charts below the map.
The "hide map tracks" button can be used to show/hide the lines on the map showing the route of each plane.

The central bar of buttons between the map and the charts is primarily for the 'replay' buttons. They do what you would expect i.e. you can play, pause and reset the animation of the gliders flying around the task.
Top tip: keep in mind different simulator flights that look similar often have different times/dates in the tracklog. This is likely to be true if you have completed the same MSFS task on different days (some MSFS loggers record 'simulator' time, others record 'real' time). Even on a real gliding competition day competitors might start an hour apart. So there are two equally valid ways to animate multiple tracklogs together. One is to start the animation at the first logpoint of the earliest flight, and animate all the tracklogs using this same 'realtime' clock. This works well for real gliding competition flights that are obviously on the same day and in the same weather. The alternative method is to synchronize the START TIMES for all gliders flying the same task. This allows the flights to be directly compared and makes more sense if multiple pilots are flying the same simulator task on different real-world days but with the same simulator date/time and weather.
Actually it would be best if MSFS soaring flights were better structured with a common clock and weather AND the logger recorded simulator time, not real-world time, but this is not currently always the case.
Note that the 'start time' of the replay is the EARLIEST timestamp of any tracklog that is loaded. If you only have a single tracklog loaded this is what you'd expect and everything is very simple. With multiple tracklogs loaded it is possible for their times to differ by a great deal (i.e. decades). You can select/unselect individual tracklogs using the checkboxes on the "Tracklogs" list and the replay "start time" will adjust to the earliest time of the selected tracklogs.
For viewing gliding competitions, the "Sync starts" checkbox is important. This creates a time offset for every tracklog so each plane in the replay animation crosses the start line at the same time. This is very important for sim-soaring flight comparisons when the pilots may have flown the flight on different days.
The Icon data checkbox shows height and speed above each of the glider icons, as is also shown top-left of each tracklog chart. You can toggle icon data on/off for a single glider by clicking its icon, or clicking its chart.
The B21 Task Planner can connect to multiplayer services that serve aircraft position information in the Whazzup / IVAO text format. Note to send YOUR plane position information to a multiplayer server (so other people can see you) you must install a corresponding transmitter that connects to MSFS, picks up your latitute/longitude, and sends that to the server.
The Planner will distinguish between gliders and other aircraft (using relevant icons) and will also highlight the aircraft you are flying to differentiate it on the map compared to the others. The Planner compares the 'Multiplayer Pilot Id' in your Planner Settings with the id's received from the multiplayer service to identify the aircraft you're actually flying.
With the multiplayer options set correctly you'll see other planes on the map as below:

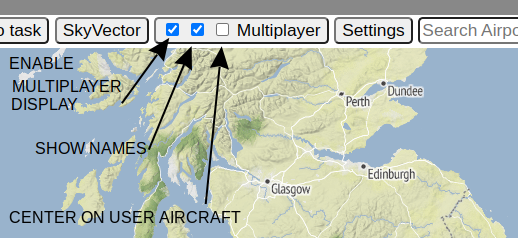
The first step is to enter the appropriate Multiplayer Settings. The B21 Task Planner is not itself hosting a multiplayer server, nor is it transmitting your position to any multiplayer server. In a tragi-comical situation MSSF has neglible multiplayer support so you'll need to find 3rd-party options for these.

Once those Settings are correct, you can display the aircraft from the multiplayer service on the B21 Task Planner map by clicking the first checkbox on the 'Multiplayer' button. The other multiplayer checkboxes provide incremental useful features i.e. adding the player identifiers and centering the map on YOUR aircraft.
You'll see the 'map-centering' feature immediately transforms the B21 Task Planner into a moving map with your plane plus any flightplan you've set displayed.
The NB21 Logger (download from here) provides a 'launch link' for the B21 Task Planner web app which allows a connection to be made between that Windows logger (and hence MSFS) and the B21 Task Planner. Flightsim info from MSFS can be requested and displayed in real-time on the Task Planner map.
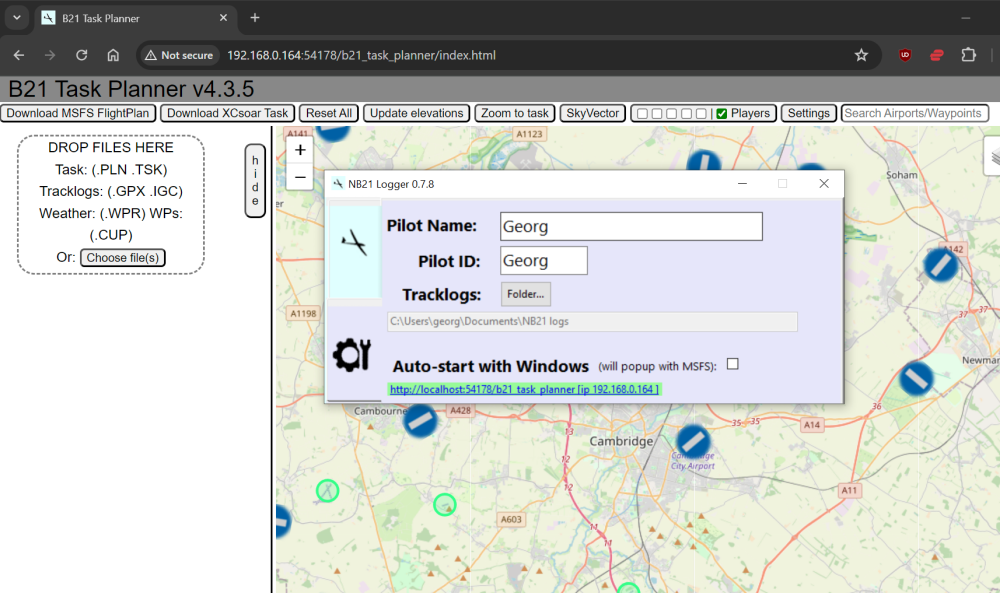
Firstly, this allows the Task Planner to draw your aircraft in real-time on the correct position and heading on the map. Also the Planner can discover the 'task' (i.e. the PLN file that was loaded) and automatically display that. This connection/communication capability between MSFS - NB21 Logger - B21 Task Planner has considerable potential for further development but time will tell.
You can drag-and-drop ".cup" files into the drop-zone. In the screenshot below I have selected the file "BGA 2022 Revision a SeeYou.cup" to
load the British Gliding Association competition waypoints. A good source of soaring waypoints is:
Worldwide Soaring Turnpoint Exchange
AFTER choosing your country, follow the link for "Files formatted for downloading...", the SeeYou or XCSoar 'CUP' format is what we need.
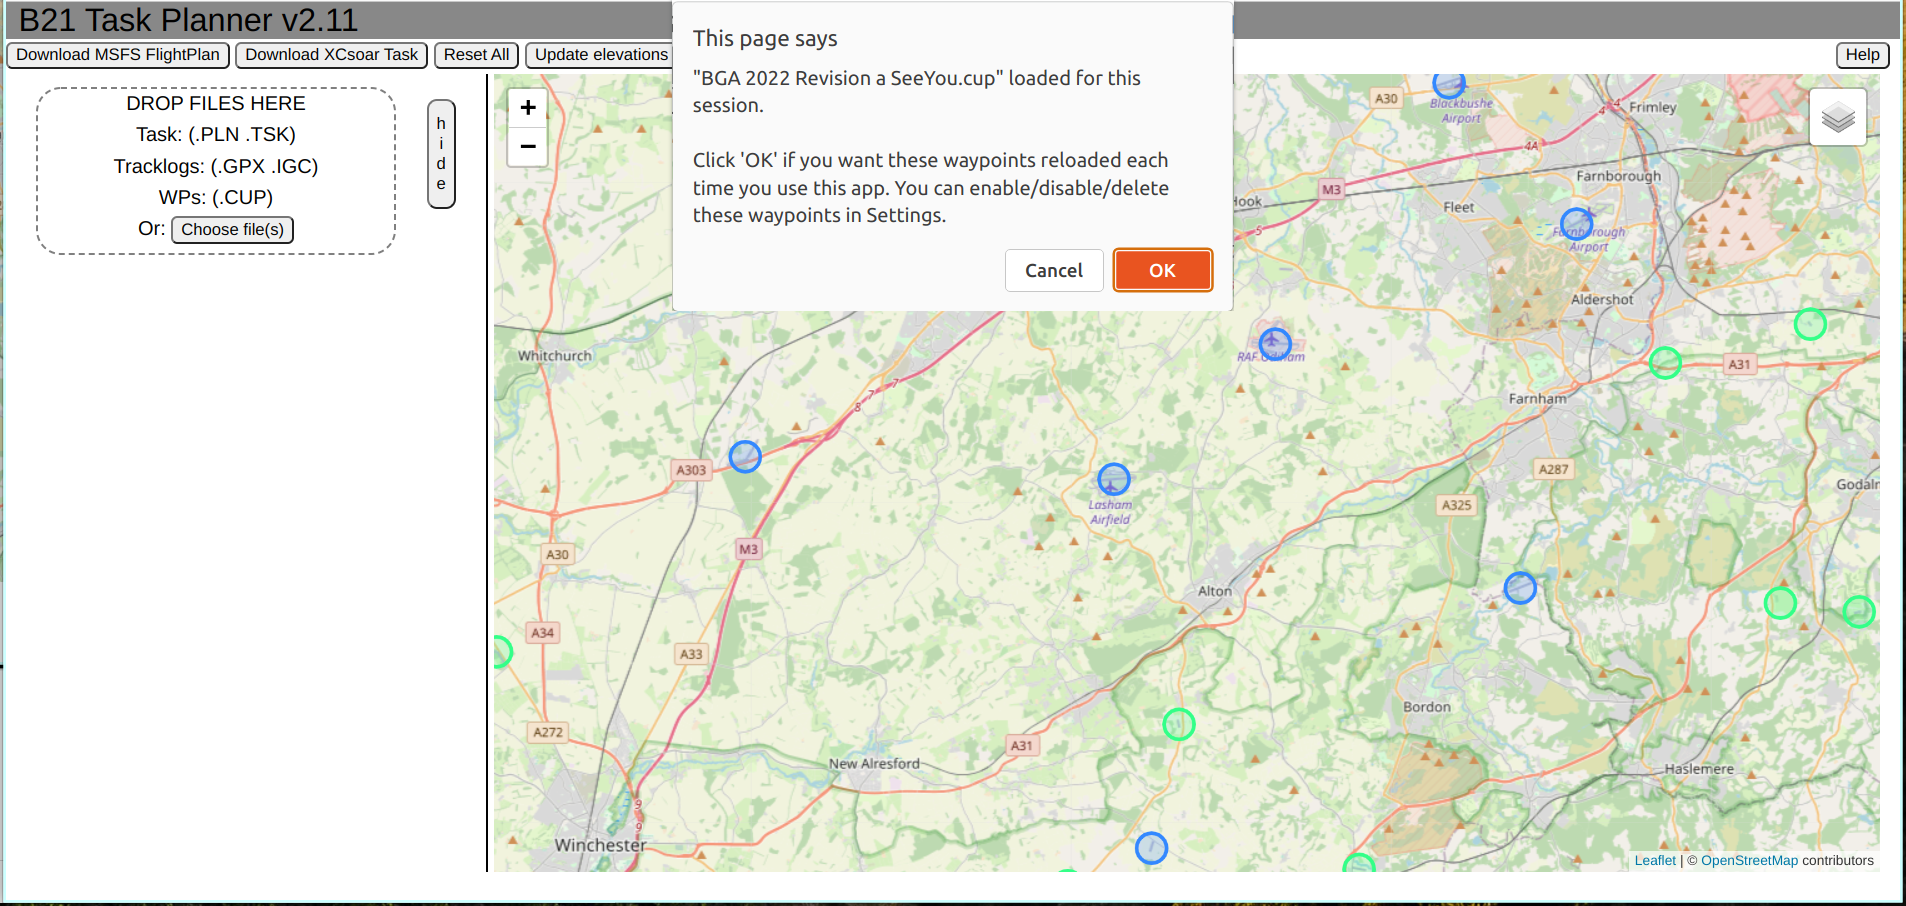
After clicking 'OK' or 'Cancel', the waypoints will appear on the map as  . Hovering the mouse over
waypoint will show the information popup, and the 'id' (or 'code') of the waypoint and the 'name' will be included in the search function
provided on the menu bar.
. Hovering the mouse over
waypoint will show the information popup, and the 'id' (or 'code') of the waypoint and the 'name' will be included in the search function
provided on the menu bar.

As mentioned in the pop-up, you can either load these 'CUP' waypoints only for your current session (i.e. they will be forgotten when you refresh the browser, or you can click 'OK' at the prompt and these custom waypoints will be stored within your browser to be loaded from this local storage whenever you access the Planner. Via 'Settings' you can control whether the stored waypoints are automatically loaded when you start the Planner, or whether they are stored for future use but otherwise 'disabled'. Choosing the 'disabled' option means the Planner will retain but ignore those custom waypoints, saving you a few milliseconds of startup time. Example below:

The generic url for the B21 Task Planner is:
https://xp-soaring.github.io/tasks/b21_task_planner/index.html
although in general it might be better to just type "b21 task planner" into Google.
For each of the recognised file types, you can add url's (OMITTING THE "HTTPS://") to those files to the Planner web URL using the
file type as the key, e.g. adding a 'pln' task file:
https://xp-soaring.github.io/tasks/b21_task_planner/index.html?pln=xp-soaring.github.io/tasks/b21_task_planner/files_PLN/HusBos 100km.pln
A cool thing is you can add a combination of a task and tracklog (i.e. add both a '?pln= .. ' and '&gpx= ..') and both those files will be loaded so you can see someone's tracklog scored against the corresponding task, e.g. here
You can put a list of web URL's to task and tracklog files into a plain text file with suffix ".comp" (for "competition"), and then load that file into B21 Task Planner, and the planner will load all the files referenced. E.g. we have a sample "Lasham_2001_Day_4.comp" containing:
https://xp-soaring.github.io/tasks/b21_task_planner/testing/files_comp/Lasham_2001_Day_4/Lasham_2001_Day_4.pln
https://xp-soaring.github.io/tasks/b21_task_planner/testing/files_comp/Lasham_2001_Day_4/254.IGC
https://xp-soaring.github.io/tasks/b21_task_planner/testing/files_comp/Lasham_2001_Day_4/335.IGC
https://xp-soaring.github.io/tasks/b21_task_planner/testing/files_comp/Lasham_2001_Day_4/36.IGC
https://xp-soaring.github.io/tasks/b21_task_planner/testing/files_comp/Lasham_2001_Day_4/381.IGC
https://xp-soaring.github.io/tasks/b21_task_planner/testing/files_comp/Lasham_2001_Day_4/387.IGC
https://xp-soaring.github.io/tasks/b21_task_planner/testing/files_comp/Lasham_2001_Day_4/391.IGC
https://xp-soaring.github.io/tasks/b21_task_planner/testing/files_comp/Lasham_2001_Day_4/40.IGC
https://xp-soaring.github.io/tasks/b21_task_planner/testing/files_comp/Lasham_2001_Day_4/430.IGC
https://xp-soaring.github.io/tasks/b21_task_planner/testing/files_comp/Lasham_2001_Day_4/494.IGC
https://xp-soaring.github.io/tasks/b21_task_planner/testing/files_comp/Lasham_2001_Day_4/540.IGC
https://xp-soaring.github.io/tasks/b21_task_planner/testing/files_comp/Lasham_2001_Day_4/570.IGC
https://xp-soaring.github.io/tasks/b21_task_planner/testing/files_comp/Lasham_2001_Day_4/630.IGC
https://xp-soaring.github.io/tasks/b21_task_planner/testing/files_comp/Lasham_2001_Day_4/710.IGC
https://xp-soaring.github.io/tasks/b21_task_planner/testing/files_comp/Lasham_2001_Day_4/744.IGC
https://xp-soaring.github.io/tasks/b21_task_planner/testing/files_comp/Lasham_2001_Day_4/775.IGC
https://xp-soaring.github.io/tasks/b21_task_planner/testing/files_comp/Lasham_2001_Day_4/910.IGC
https://xp-soaring.github.io/tasks/b21_task_planner/testing/files_comp/Lasham_2001_Day_4/930.IGC
https://xp-soaring.github.io/tasks/b21_task_planner/testing/files_comp/Lasham_2001_Day_4/D2.IGC
https://xp-soaring.github.io/tasks/b21_task_planner/testing/files_comp/Lasham_2001_Day_4/E4.IGC
https://xp-soaring.github.io/tasks/b21_task_planner/testing/files_comp/Lasham_2001_Day_4/FBN.IGC
https://xp-soaring.github.io/tasks/b21_task_planner/testing/files_comp/Lasham_2001_Day_4/GP.IGC
https://xp-soaring.github.io/tasks/b21_task_planner/testing/files_comp/Lasham_2001_Day_4/JSL.IGC
https://xp-soaring.github.io/tasks/b21_task_planner/testing/files_comp/Lasham_2001_Day_4/P2-2.IGC
https://xp-soaring.github.io/tasks/b21_task_planner/testing/files_comp/Lasham_2001_Day_4/V7.IGC
https://xp-soaring.github.io/tasks/b21_task_planner/testing/files_comp/Lasham_2001_Day_4/V8.IGC
https://xp-soaring.github.io/tasks/b21_task_planner/testing/files_comp/Lasham_2001_Day_4/Z8.IGC
You can add a '?comp= ...' reference onto the B21 Task Planner URL, and the planner will load that .comp file and then load all the files referenced within it. E.g. as here
Please note an awkward technical detail, the ".comp" file DOES contain the "https://" part of the URL, while all URL references added as properties to the planner URL must OMIT the "https://" part. Also, because the Planner is served to you over 'https' then the browser security requires all other web references from within that page to be 'https' also, i.e. you cannot load files from 'http' web addresses.
| WP elevation | For an airport the default elevation will be the ground elevation for the airport defined by MSFS. In most circumstances this should work great. For a user waypoint, the ground elevation will default to 0 MSL. |
| WP max altitude | no limit |
| WP min altitude | no limit |
| WP radius | 500 meters |
| Start sector radius | 2500 meters |
| Finish sector radius | 2000 meters |
Note a MSFS flightplan (.pln) contains two different kinds of waypoints, and treats them differently:
This needs to be an MSFS AIRPORT, i.e. have an ICAO code entered in the B21 Task Planner. The task planner will do this automatically if you click on an airport.
This needs to be an MSFS AIRPORT, i.e. have an ICAO code, again the task planner will do this for you when you click on an airport on the map.
Technically these can be either "Airport" waypoints (with an ICAO code) or "User" waypoints (without an ICAO code). For gliding tasks, it really makes the most sense for ALL intermediate waypoints to be "User" waypoints, because at the very least B21 Task Planner can annotate those with the ground elevation which can make its way through into the aircraft instruments. IF a .PLN waypoint is added as an "Airport", i.e. with an ICAO code, then ALL information in that waypoint will be discarded by MSFS except for the ICAO code and new lat/long/elevation values will be created inside MSFS.
If the waypoint is added as a "User" waypoint (i.e. no ICAO code), then MSFS will accept the lat/long and name, and discard the elevation and create a new seemingly random (for a glider) value for that.
B21 Task Planner tries to be helpful with your "Airport" waypoints. You're FIRST waypoint most be an airport if you want to download a PLN, because MSFS needs that for the DEPARTURE. After that, when you click on an airport, B21 Task Planner doesn't know at that point if you've just set the DESTINATION (so it should keep the wp as as "Airport") or you're planning it as an intermediate waypoint which is common for gliding tasks. If you click to make the NEXT waypoint, B21 Task Planner will switch any prior "Airport" waypoint into a "User" airport, prepending the ICAO code onto the waypoint name and removing it from the ICAO data field.
None of this would be necessary if MSFS just made the flightplan available to instruments without mangling it first, including any custom data that the MSFS stock instruments could just ignore.
As described above, the "NAME" used for "User" waypoints is still visible after MSFS loads the PLN file. Essentially the instruments see name/lat/long for the waypoint, the elevation is garbage, and any other info added in the PLN file is ignored. So we encode any additional information we want for soaring into the "NAME".
The 'nav' instruments in the freeware gliders decode this 'name encoding' format, and B21 Task Planner is a convenient tool for encoding information into the waypoint names in the PLN. E.g. a User waypoint "Blairstown+375" is recognized by the instruments as being at 375 feet.
To pass these additional parameters through to MSFS and the aircraft, while ensuring the flight plan remains completely compatible with 'plain vanilla' MSFS, the B21 Task Planner encodes the additional parameters into the name assigned to the waypoint.
* is used to flag a WP as the Start or Finish of the task, prepended to the name, e.g. "*Burnt Cabins" will imply the "Burnt Cabins" waypoint is the start or finish (the first *WP will be the start, the second one will be the finish)
+ indicates the elevation in feet of the waypoint, e.g. "Burnt Cabins+2310" implies the "Burnt Cabins" waypoint is at 2310 feet.
| indicates the max altitude in feet permitted at the waypoint.
/ indicates the min altitude in feet permitted at the waypoint.
x any time after the | indicates the diameter (i.e. 2x radius) of the waypoint in meters
| Burnt Cabins | A waypoint with the default values for the soaring parameters (e.g. a waypoint elevation of 0 MSL) |
| *Burnt Cabins | This waypoint is the start or finish WP of the task. |
| Burnt Cabins+2310 | The elevation of the WP is 2310 feet |
| *Burnt Cabins+2310|6000 | Burnt Cabins is the start (or finish) WP with an elevation of 2310 feet and a max start height of 6000 feet MSL. |
| Burnt Cabins|6000 | The WP has a max altitude of 6000 feet MSL |
| Burnt Cabins/1000 | The WP has a min altitude of 1000 feet MSL |
| Burnt Cabins|x800 | The WP has a turn DIAMETER of 800 meters (i.e. a radius of 400 meters). The | is required anywhere before the x, which can most simply achieved by adding the turn diameter after the other WP parameters. |
| *Burnt Cabins+2310|6000/1000x800" | The WP "Burnt Cabins" is a start or finish waypoint, at an elevation of 2310 feet MSL, a maximum turn altitude of 6000 feet, a minimum turn altitude of 1000 feet, and a turn diameter of 800 meters (radius 400m). |
Note for user-interface purposes we talk about a turnpoint RADIUS, because that aligns with the distance-to-go value pilots will see displayed in the glider nav instruments. For 'historical' reasons the name encoding format actually records the DIAMETER so the user input value is doubled before it is inserted into the PLN and halved each time it is displayed.