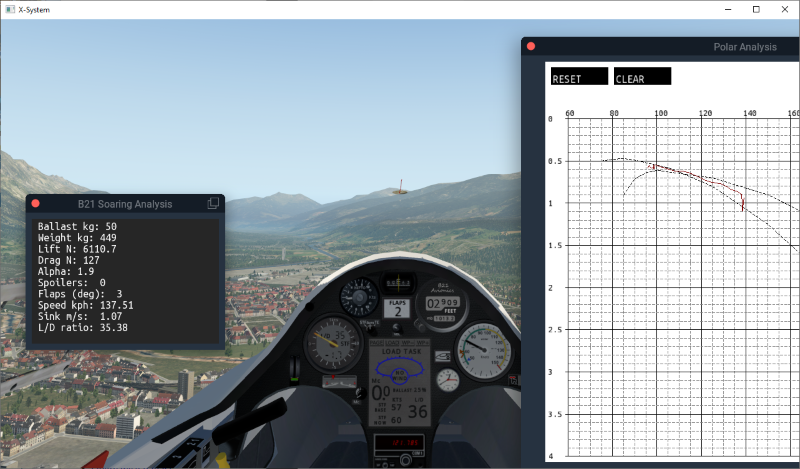

Here's some background to what was involved in creating a high-performance X-Plane glider, in case that helps other developers. Even starting with an essentially complete 3D model (credit Windsocks team, rnb), it took months to get a reasonably accurate flying performance at all speeds with all flap settings and all ballast settings.
Back in April 2007, a couple of guys (with the web names ManuG and Laurent_B) created a freeware team and built an ASG-29 for X-Plane Version 8.6 (ref), also creating a website for it which is now only visible on internet archives ( here)
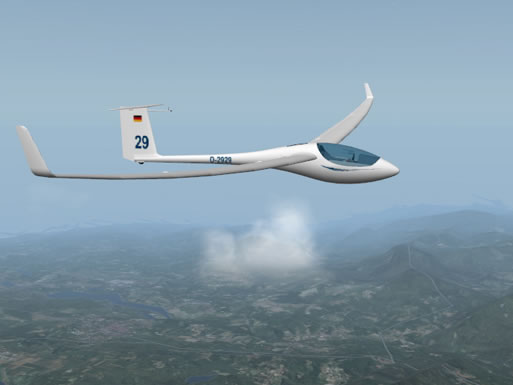
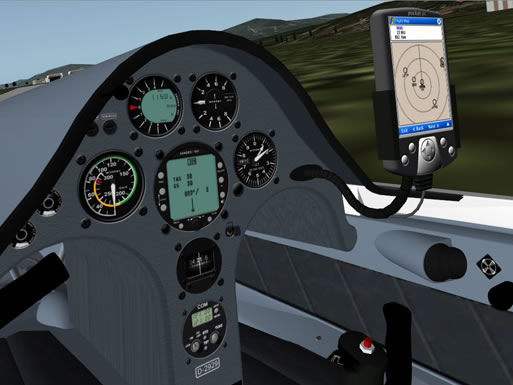
The effort of the Windsocks team produced great X-Plane aircraft, particularly the 3D modelling, but the contribution ended within about 12 months and the models quickly became obsolete as X-Plane progressed through continual development.
In July 2019 an X-Plane forum member rhb revived the ASG-29 by migrating it forwards through the various newer X-Plane versions to arrive at the current version, X-Plane 11 (here)
At this point the model still reflected the 3D excellence of the original model but the flight model and the instruments were in need of some serious attention, and the project was picked up by B21 to improve those things.
The ASG29_B21 mostly looks the same as the original Windsocks model, but has improved animations such as for the flaperons and yawstring, and also takes advantage of the more recent X-Plane particulates system. Sounds have been substantially improved also.

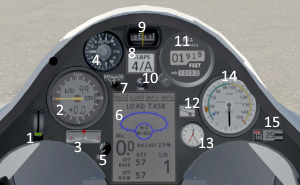
The instruments are all new, and provide soaring functionality not available on any other glider in any sim.
Firstly, the fundamental overwhelming challenge affecting all freeware high-performance glider developments in any sim is that there are two essential roles with different skillsets that are needed for success:
FlightSim modelling has for a long time attracted people capable of creating truly awesome detailed 3D aircraft but these people are unlikely to have the skill or the enthusiasm to spend possibly five times that amount of time adding the programming necessary to provide the pilot with a realistic interactive experience.
For the ASG-29 in X-Plane 11, the solution was found by resurrecting the 3D model from the Windsocks team (credit rhb), and B21 contributing four months of programming to arrive at the ASG29_B21.
Retrospectively updating a 3rd-party model with new flight model, plugins and instruments inherently has major compromises. It is extremely complex for a 'programmer' to graft new instruments into a 3rd-party 3D cockpit without someone with Blender skills being able to edit the original model. At best, complex surgery can be done on the anonymous 3D vertices stored in the original cockpit '.obj' file to remove small pieces of the original aircraft (such as unwanted instruments). Without 3D modelling, the new instruments (in fact the entire panel) will not have any 3D relief, i.e. no 3D bezels or separately modelled needles and instrument faces which detracts from the quality of the overall model and frankly sucks in VR. Also, some aspects of the original 3D model will inevitably be 'out-of-date' by the time it has been migrated forwards through newer X-Plane versions - in the ASG-29 case this particularly involves the modelling of the cockpit canopy and glass.
The remaining challenge is that modern sailplane performance is extreme, the ASG-29 particularly so, and modelling that in X-Plane was never going to be easy. There remain aspects of this model that are not quite right, including the stall behaviour and the higher-speed performance of positive flap settings, but we've got something that is 'mostly right' and something I'm happy to fly.
There is a lot of soaring-relating programming embedded into the ASG29_B21, all of which is open source without constraint i.e. I am equally happy for freeware or payware to take any of the code as-is or use it to learn how to program essential soaring functions. This includes the essential complex soaring calculations which are:
Note that until mid-2019, no X-Plane gliders had any of these embedded calculations, and since then only the TE compensation has become available, in part because of the development leading to this glider (i.e. similar programming is in the ASK21_B21).
The various source files from which the download 'zip' was created can be found in a Github repo. You can either browse this stuff on the internet or install a program called "Git" and issue the command "git clone https://github.com/xp-soaring/ASG29_B21" which will install a local copy on your machine.
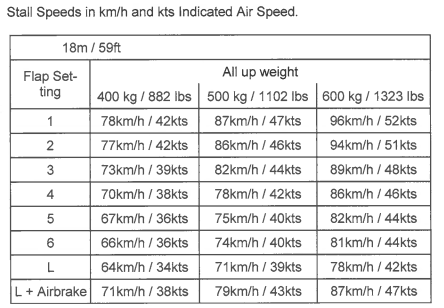
This stuff was available on the Schleicher website (easy to find) and in the owners manual (almost impossible to find).


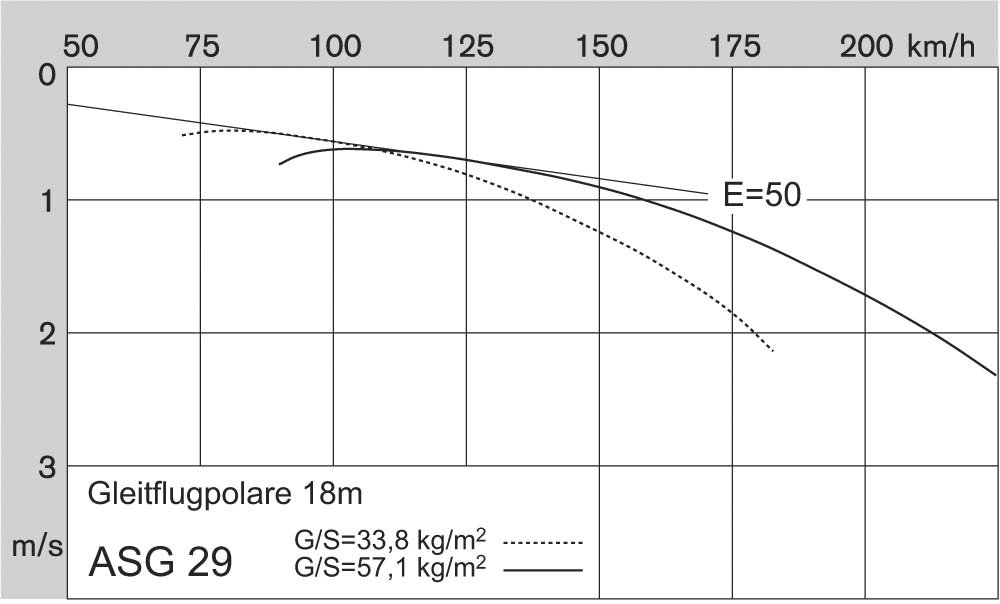
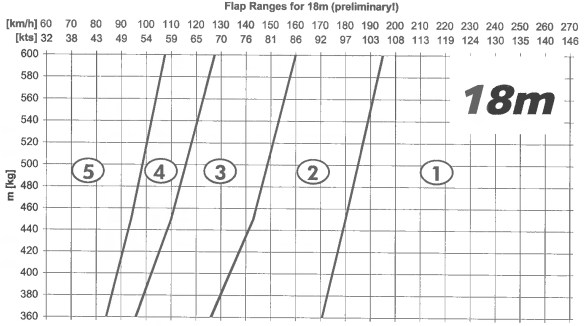

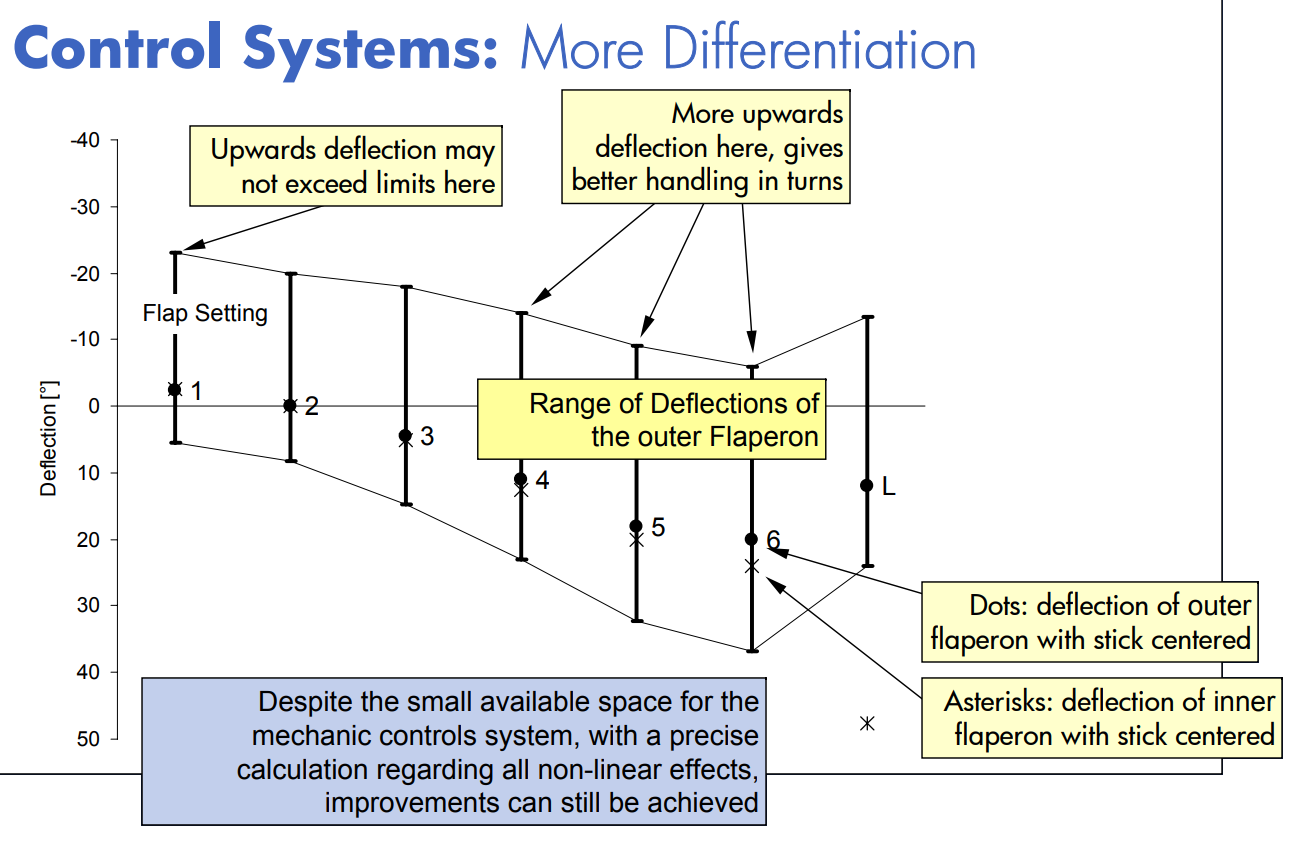
There is this additional useful presentation slide from the designer which shows the aileron movements relative to the various flap settings:

The airfoil is the most critical element in X-Plane to get your glider to approximate the correct polar.
The first step is to ensure your wings in Plane Maker have the reasonably correct aspect ratio and span and ensure your wings join together at the fuselage center-line. This is to ensure X-Plane treats your aircraft as having a 30:1 aspect ratio, not two independent wings of 15:1 each.
Expect this to involve many trial-and-error hours in X-Plane Airfoil Maker, where you can nudge improvements in the glide ratio by reducing the drag or increasing the lift or vice versa. Be aware that increasing the lift will add induced drag which above a certain point will mean increased lift (i.e. Cl) in the airfoil at a given angle-of-attack (i.e. alpha) will actually reduce the lift/drag ratio (aka Glide Ratio) (so perversely you can improve the glide ratio by reducing the lift).
The basic rule to remember for glider modelling is GLIDE RATIO = (Cl / (Cd+Cdi)) where Cl and Cd come from your airfoil coordinates and Cdi is calculated from your Cl (see here).
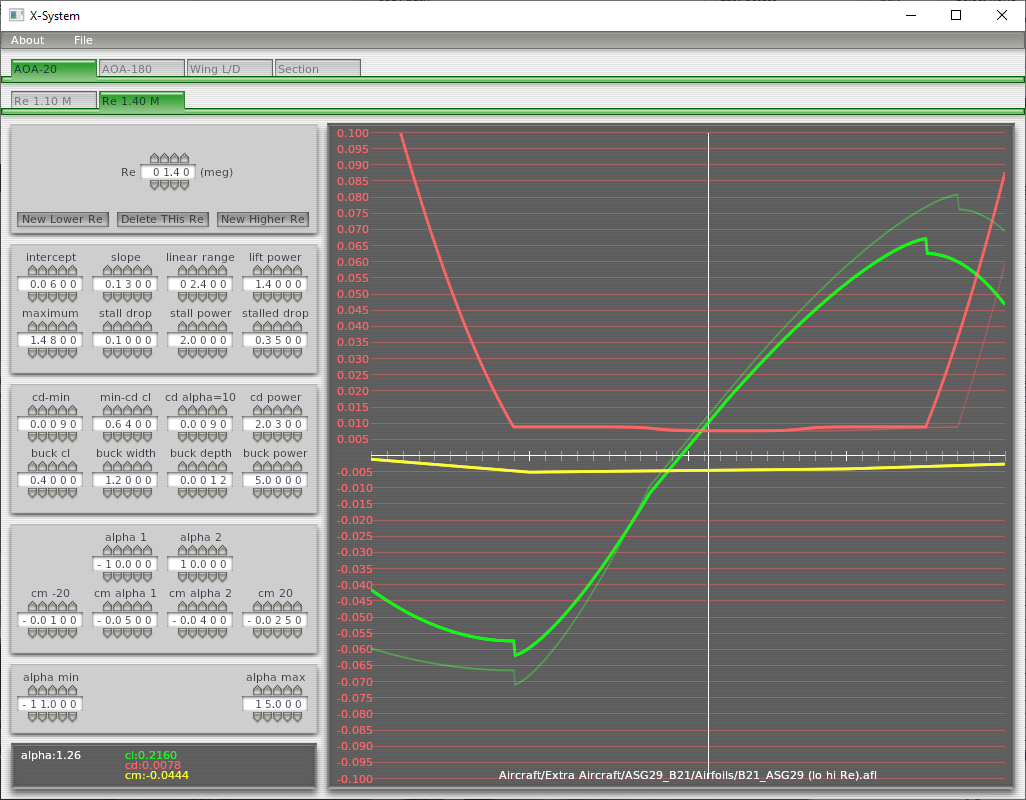
To reduce the stall speed, shift your alpha max upwards, so the positive lift extends up into higher angles of attack. X-Plane allows different airfoil parameters to be specified for different 'Reynolds Numbers' (which basically equates to different airspeeds) and in the ASG29_B21 I've used two airfoils with the 'low-speed' airfoil in the lighter shade in the chart below. You can see I extended the alpha max and the Cl maximum upwards for the low-speed airfoil. Using two airfoils allows you to control the low speed and high speed stall separately.
This is going to be really hard work unless you have some plugin support. I have published (again open-source) the plugins I created to help analyze the ASK21_B21 and this ASG29_B21. See here.
These were for my own use so don't expect documentation, but the plugin provides the following "Polar Analysis Window" (this image also has text annotations at the top by me during development to help me remember which aircraft settings were relevant for that particular test, which was for full ballast in each flap setting):
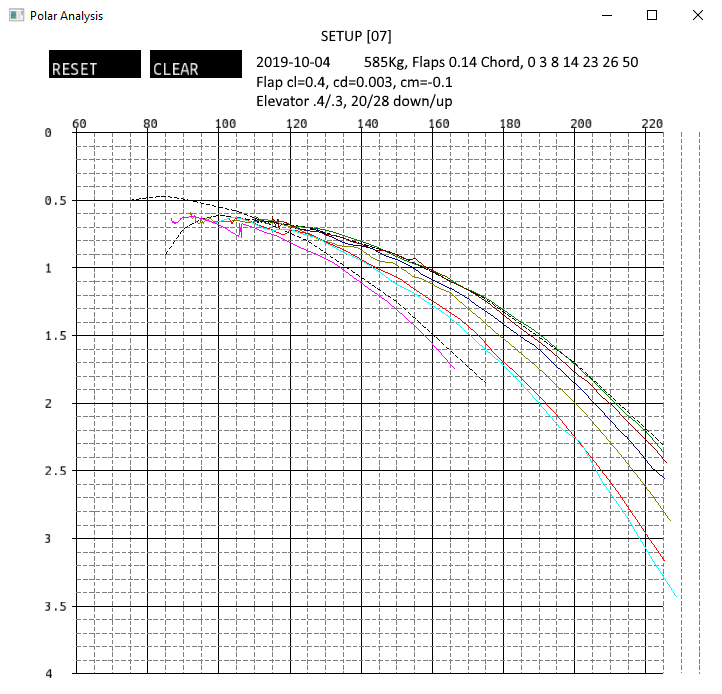
The plugin has a couple of black 'dashed' lines representing the dry and fully ballasted polars from the manufacturer's spec given earlier on this page (they're easier to see at the slow end of the polar). You can see the ASG29_B21 is very accurate at normal cruising speeds (i.e. the '1' and '2' flap positions really track the max performance very closely). The manufacturer's polar spec is coded into the plugin so it can draw those dashed lines for comparison, and those points would need updating for a different aircraft. After getting the cruise performance right it takes a lot of time to tweak the low-speed performance (i.e. L/D, stall) not least because every change to the airfoil can have implications elsewhere in the flight envelope you might not have expected such as thermalling or pull-ups.
The "Polar Analysis Window" will update a line on the graph as you fly and to get a decent line you have to fly smoothly and very gradually accelerate (or decelerate). Note the plugin starts a new line for each flap setting, so my technique has been to fly in Flap 1 from say 100 kph to 220 kph and hit 'down flap' into Flap 2. This will preserve the curve for Flap 1 while I decelerate quickly back to 100 kph with a garbage line for Flap 2, but can hit 'CLEAR' to erase that one line and now proceed the same as I did for Flap 1. When I'm happy with the combined graph lines, I just hit X-Plane 'PAUSE' and screenshot the window (which is easy if the plugin window is OUTSIDE X-Plane).
'RESET' will reset the entire window, 'CLEAR' will just delete the points in the line for the current flap setting.
There's another window 'Analysis Window', I haven't screenshot (but you can see it in the image at the top of this page), which conveniently shows continuously updating values for a variety of essential parameters, like aircraft angle-of-attack and airspeed, so you can easily see which bit of your airfoil profile you're actually using.