DOWNLOAD available here
SUPPORT FORUM available here
Thanks to Chris "Nodd" Evans for extensive testing, I recommend you check out his YouTube channel:
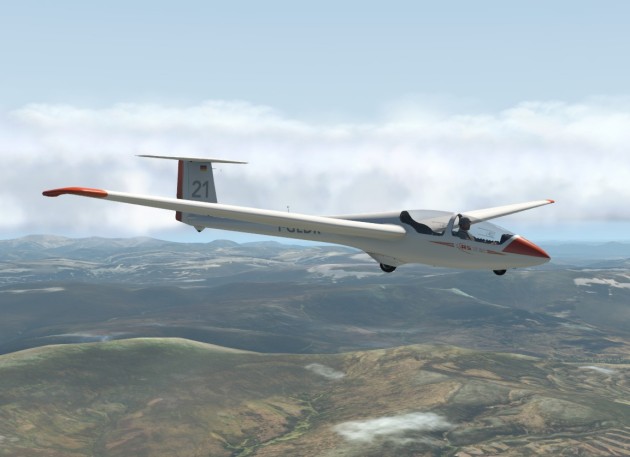
The ASK21_B21 is a comprehensive upgrade of the stock X-Plane ASK21. The most significant changes are to instrument panel (see below) but also the flight model has been re-worked and tools used to ensure the glide performance (i.e. the polar) is close to the real aircraft as possible.
There are additional improvements for example in the various sounds, switchable instruments for imperial/metric units, and configurable commands in general intended to make the glider enjoyable to fly. But it is the programming of the existing and new panel gauges where the most significant changes have been made.
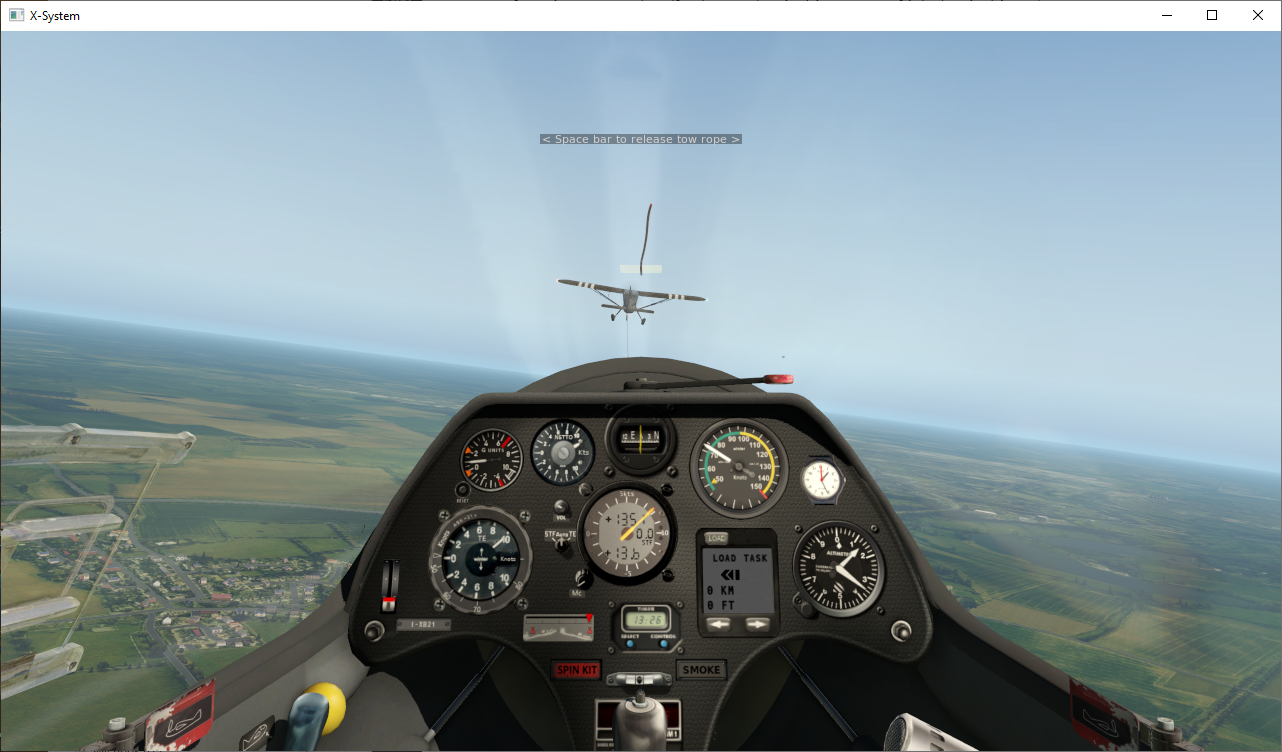
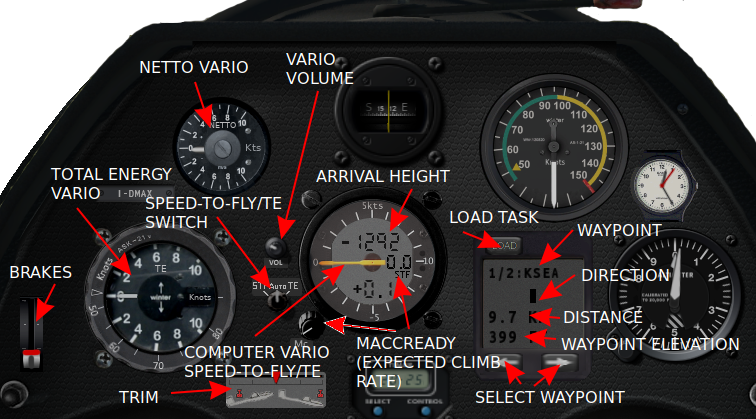
The panel is screenshot below. The major upgrades are to the gliding rate-of-climb instruments, i.e. the variometers. In addition there is a GPS navigation instrument.
More detail is given in the separate article on soaring instruments.
In summary, the upgraded panel includes three variometers. The starting point for all of these is the rate-of-climb indicator (which is not on the panel) which would always indicate your current true rate of climb (or sink). Unfortunately for soaring pilots this indication is essentially useless as the pilot's movement of the controls will dominate the short term reading, creating so-called 'stick thermals'. The three variometers on the ASK21_B21 panel improve upon this in a cumulative three ways:
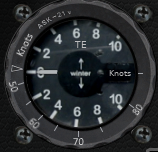
The Winter Vario (panel bottom left) displays rate-of-climb adjusted to take into account whether the aircraft airspeed is increasing or decreasing, referred to as Total Energy compensation. If the pilot pushes the stick forwards the glider will sink faster and increase in airspeed. If the pilot pulls the stick back the reverse will happen. So a 'pitot' (i.e. the forward facing airspeed pressure inlet) bleed can be added to the 'static' (i.e. altitude) pressure feed the simple rate-of-climb instrument uses to give a compensated reading that cancels out the effect of accelerating or decelerating.
The end result is a variometer that shows how fast the glider is climbing or sinking without injecting 'stick thermals' every time the pilot moves the controls. The compensation of the vario is easy to recognise in flight by pushing and pulling on the stick and you'll see in the short term the needle reading doesn't move much where in a pure rate-of-climb indicator the needle would be swinging wildly from lift to sink.
The Winter Vario has a "Maccready Ring" around the outer rim which rotates (use mouse). The small triangle pointer on the ring (next to the "50" graphic on the ring in the image above) should be turned clockwise to align to the vario reading that corresponds to the rate-of-climb expected in the next thermal. The vario needle, as you fly through lift, sink and still air, will simultaneously point to two values: (1) the actual lift/sink value on the face of the instrument as normal and (2) the value on the ring which suggests the airspeed you should be flying at given this lift or sink. More detail on how this works is given after discussion of the computer vario (which does it rather better) below.
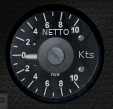
The panel top-left smaller (57mm) variometer reads the Netto sink/climb rate. This is really simple in concept: the sink rate of the glider in still air at the current airspeed is subtracted from the total energy reading shown on the Winter Vario described above. If you watch the two varios carefully in flight you'll see they appear to move in tandem, with the Netto reading just offset upwards. This amount of offset of the Netto needle varies with the speed of the aircraft to match the way the 'still air' sink rate of the aircraft varies with airspeed.
The end result is the Netto Vario is showing you the sink rate of the air through which the aircraft is flying (as the natural sink of the glider has been deducted). In X-Plane you can witness this by choosing a flight in 'clear' weather and once you're off tow the needle will read pretty close to zero throughout your flight in spite of you flying at a variety of speeds.
Note the simulated instrument doesn't 'cheat' by reading vertical air movement from X-Plane - it does the same calculation as is built into the real instrument using airspeed and altimeter climb/descent rates so it is fairly accurate but will deviate in certain circumstances such as a low-G push-over just like the real instrument. At very fast or very slow airspeeds the aircraft 'polar' calculation calibrated into the instrument can't hope to be perfectly accurate so the netto reading will drift in these corners of the flight envelope, again like the real thing.
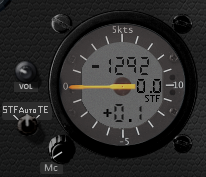
The 'Computer Vario' (center of panel, with yellow needle) is by far the most sophisticated of all, but can still be interpreted as a simple 'rate-of-climb' indicator. The computer vario can operate in two modes - Total Energy (i.e. identical to the Winter Vario described above), and Speed-to-Fly. The instrument is typically used in Total Energy mode when thermalling, and Speed-to-Fly mode when cruising between thermals, and on the 'Auto' setting will automatically switch between the two.
The knob labelled "Mc" in the picture above is used to dial-in a Maccready Setting. This can be interpreted different ways but the simplest is as the expected strength of your next climb. I.e. the setting has the same units as your vario setting, e.g Knots, and the setting is displayed in the two digits at 3 o'clock in the picture above in which it is the "0.0" above the 'STF' graphic.
The computer vario will do many calculations based on how fast you are intending to fly, a simple example being your arrival height at a future waypoint will depend on your sink rate at your planned cruising speed with this being related by the glider polar. This may sound a circular explanation but the vario itself (in Speed-to-Fly mode) will be telling you how fast to fly and the vario assumes reasonably you will be mostly following that guidance. But it uses the pilot input for the expected strength of thermals to calibrate it's recommended speed-to-fly.
The net of all this is the Maccready Setting is the pilot's one communication with the computer vario which then adjusts everything else. The pilot learns pretty quickly that in still air a Maccready setting of, say, 3 knots will give a recommended speed of say 70 knots, or maybe a 4 knot Maccready will recommend 80 knots airspeed. A perfectly normal use of the Maccready setting is for the pilot, with years of experience of how fast they should fly in different weather conditions, to turn the Maccready UP when they want to fly a bit faster or DOWN when they feel they should be cautious. The computer vario will still do all the calculation trickery to continuously adjust the speed appropriately in any lift or sink. (Note the actual speeds in a heavily ballasted racing glider like the ASW27 will be much higher)
The Maccready Setting has a special use on final glide (see below). It is normal for the pilot to fly the course with an optimal cross-country Maccready Setting for the weather, say 3.5 knots, and at some point the arrival height for the finish will become positive (happy news). At this point the pilot is likely to set off for the finish but may still dolphin in thermals and gain a bit of energy on the way so the predicted arrival height continues to improve. At this point the pilot can turn UP the Maccready until that reduces the arrival height to a small margin above the airfield, and then follow the Speed-to-Fly much faster to the finish. The extra speed actually provides a built-in safety margin but only the pilot experience can assess the expected conditions on the way home to judge accurately the risk of landing out.
In Speed-to-Fly mode the variometer behaves like a normal variometer and appears to be indicating lift and sink in a fairly coherent manner, but in fact the lift and sink indications have been fundamentally transformed into a closely related concept (in soaring) that you should SPEED UP or SLOW DOWN. The general optimal practice in soaring is that you SPEED UP IN SINK and SLOW DOWN IN LIFT, and the Speed-to-Fly vario computes the optimum speed to fly given the current lift or sink, compares that to your current speed, and moves the needle and beeps or buuuurps directly according to how much you should speed up or slow down.
This is more complicated to explain than to use in practice - the net effect is a vario that beeps at you to slow down and buuuuuurps at you to speed up, which is kind of what any electronic vario is doing although the STF vario does all this relative to your current airspeed (and in fact how much water ballast you're carrying, which in the ASK21 is zero). The optimal speed for you to fly in still air varies a lot depending on the strength of the next climb you're hoping to get, and this provides the baseline around which the STF vario operates. So you tell the vario your guess of the strength of the next thermal by turning the knob for the Maccready Setting (labelled "Mc" in the picture above).
This is simpler than it sounds - a typical setting might be 3 or 4 knots and you can dial that in and leave it for most of your flight, flying between thermals at the speed the STF vario directs you to. The Maccready setting ultimately becomes a kind of 'confidence' setting - if you're feeling courageous you turn the reading up and the STF will push you to fly faster, using up height at a scary rate but a strong climb will make all that worthwhile.
The computer vario also computes 'arrival height' at your next waypoint, using Nav data provided by the GPSNav instrument. This is described below.
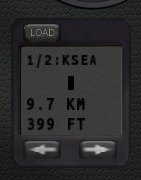
The rectangular instrument to the right of the computer vario is the GPSNav instrument, used for navigation and feeding details of the next waypoint (such as elevation, bearing, distance to go) into the computer vario.
A soaring task is loaded into the GPSNav by clicking the 'LOAD' button and responding to the standard X-Plane 'load flightplan' prompts. You can create a 'task' by using external map-based utilities like Little Navmap (Mac, Linux or Windows) or G-Plan (Windows). The GPSNav will pick up the waypoint names and lat/longs from the task, and compute the ground elevation at each waypoint using an internal database.
In the screenshot of the panel above, a task beginning at KSEA (Seattle Airport) has been loaded, which is turnpoint 1 (i.e. start) out of 2 (hence display 1/2: KSEA).
The next turnpoint can be selected at any time with the RIGHT ARROW button, and similarly the LEFT ARROW will move you backwards through the task.
The GPSNav is currently saying KSEA is directly ahead (the single DIRECTION vertical bar). If the turnpoint was to the left or right, chevrons would extend in the appropriate direction guiding you in a faily obvious way to turn in the appropriate direction.
The GPSNav is saying the waypoint is 9.7 Km away (the distance units can be changed to miles via USER_SETTINGS.lua, see below) and has a ground elevation of 399 feet (again these height units can be changed in USER_SETTINGS.lua).
The information from the GPSNav is sent to the computer vario which will continuously calulate an expected arrival height above the next waypoint. The computer vario above is saying you will arrive 1292 feet BELOW the intended waypoint. When you have height in hand the reading will have '+' in front of it. Note that the +/- figures are above the ground at that waypoint and the default units are feet unless you've changed that in your user settings.
The GPSNav is at heart a relatively simple GPS-based navigation instrument guiding you along a stored flightplan. In contrast the computer vario is doing a very complex calculation taking into account the all-up-weight of the glider (i.e. ballast carried), the wind speed, the glide performance of the ASK21, the pilot's chosen Maccready setting, the current altitude of the glider and the elevation of the waypoint in order to calculate the expected height the glider will be at when it finally arrives at that waypoint, which could be 30+ miles away.
The calculation from the computer vario is not a guarantee - it doesn't know what lift and sink you'll fly through to get there, just like you. But it's saying if you fly at the speed indicated on the STF needle and you fly though a reasonable balance of lift and sink, the calculation will be pretty close. With experience you learn how much safety margin to add (or subtract!) from the calculation to avoid ending up in the dirt and winning the competition.
Remember the Maccready setting is telling the computer vario how fast you intend to fly (indirectly by saying how strong you think the thermals will be). So if you turn this UP your arrival height will go DOWN, and vice versa. In other words if your arrival height at the waypoint is below what you'd like it to be, you have the option of turning the Maccready setting down and hence flying more conservatively with a happy effect on your predicted arrival height.
This arrival height is everything during your final glide back to your home airport. From maybe 30 miles away you may climb high enough to have a positive arrival height above your home airfield, at which point you can set sail for home and worry a lot less about finding the next thermal. It is normal to dolphin a fair bit through thermals on the way home so you improve a bit on the calculation, and then maybe 10 miles out you can crank up the Maccready until the arrival height is only a couple of hundred feet and storm home.
The spin kit is a heavy weight which can be attached on the tail of the glider. This shifts the center of mass backwards resulting in a glider that can spin after a stall rather than always going into a spiral dive. The entire purpose is for spin recovery training necessary for later thermalling close to the stall in high performance gliders.
The "SPIN KIT" button on the cockpit panel allows the spin kit to be fitted or removed (only while you are on the ground). An external view (e.g. via shift-8) will show the weights attached to the fin.
Spin entry is achieved as follows:
A spin is quite different from a spiral dive. In a spin the glider does not accelerate much downwards, compared to a spiral dive where the falling speed and G forces will increase rapidly. The spin will not necessarily be stable i.e. the nose may fall or rise as the glider descends. If the nose falls far enough this may be enough to unstall the wings and re-enter a normal (spiral) flight mode although this may quicky result in a re-stall.
Note that the pressure-driven instruments (e.g. ASI, variometers) will seriously mis-read during a spin.
Spin recovery is classically effected via full opposite rudder to cancel the rotation plus full forward movement on the stick until the wings and control surfaces respond, and then a normal pull-out from the dive trying to minimise the G while avoiding the ground. In practice modern gliders (including the ASK21) will recover from the spin as soon as the back-pressure on the stick is removed.
The ASK21_B21 has various x-plane commands built-in that you can assign to joystick buttons or keyboard keys. To do so open the Settings screen (2nd from right icon in top right corner of the XP11 screen) and select the Keyboard or Joystick tab. There are a lot of keyboard mappings already there as part of the default installation so you might want to check these out before you start assigning your own. You will see that there are search functions for both commands and keys.
All the ASK21_B21 commands begin with "b21/...", for example the command to 'Select next waypoint' is "b21/nav/next_waypoint". Most of the commands have been designed to be general enough that they can be repeated in other gliders (I'm expecting to work on other x-plane gliders) so your keyboard/joystick will work the same.
| b21/trim/trigger | This will set your 'trim' (i.e. the controls-centered steady speed of the aircraft) to match the current airspeed of the aircraft. Note this will not necessarily match the current pitch (nose up/down attitude) as the aircraft might currently be accelerating. On the ground, the trigger trim will adjust the speed setting according to the current forward/backward position of the stick. If you use a joystick this command can usefully be assigned to the trigger button. The typical use is to pull the trigger when you've pulled up from fast flight into a thermal so setting the trim for about 50 knots for thermalling, and pull the trigger again after exitting the thermal and having sped up on cruise. |
| b21/nav/load_task | This will trigger the X-Plane 'Select FlightPlan' menu, and the selected .fms file data will be loaded into the panel nav instrument, in this case the GPSNav. |
| b21/nav/next_waypoint | The nav instrument will click over to the next waypoint in the loaded flightplan. |
| b21/nav/prev_waypoint | The nav instrument will click back to the previous waypoint in the loaded flightplan. |
| b21/vario_302/mode_toggle | Switch the computer vario between Speed-to-Fly, Total Energy, and Auto modes |
| b21/vario_302/mode_stf | Switch the computer vario directly into Speed-to-Fly mode |
| b21/vario_302/mode_auto | Switch the computer vario directly into Auto mode |
| b21/vario_302/mode_te | Switch the computer vario directly into Total Energy mode |
| b21/wings_level_toggle | Enable/disable wing levelling on the ground, i.e. like asking your crew to pick your wing up during a launch. Wings will be held level until cancelled or your ground speed is faster than your crew can run... |
| b21/wings_level_on | Enable wings levelling - the wing on the ground will be picked up and the glider held balanced. If you've read this far, here's a secret tip - the ASK21_B21 on the ground will recognise you waggling the ailerons left-right a couple of times as a signal you want your wings levelled. This would be a lot more useful if you could actually call an aerotow or winch launch but x-plane at the moment (11.3) only allows the launch to happen when you first load the flight. One day we'll improve this. |
| b21/wings_level_off | Simulates your grumpy crew walking off back to the clubhouse so your wing gently falls back to the ground. |
| b21/seat_toggle | Swaps your viewpoint from P1 (front seat) to P2 (rear seat) and vice versa |
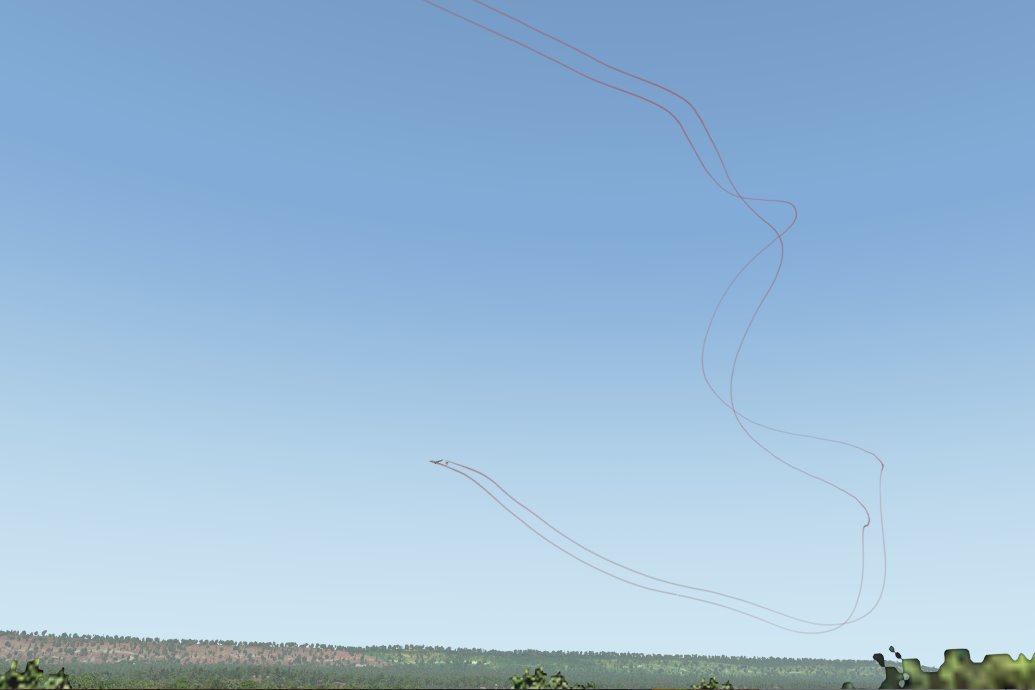
| b21/smoke/toggle | Toggle wingtip smoke on/off. Useful to control smoke with a single button rather than separate on and off as below. |
| b21/smoke/on | Turn wingtip smoke on |
| b21/smoke/off | Turn wingtip smoke off |
| b21/spin_kit/toggle | The spin kit is a large weight bolted to the base of the tailfin which moves the center of mass aft so that the ASK21 will spin more easily. Use this command to toggle that weight on and off. |
| b21/spin_kit/on | Fit the spin kit onto the glider. Command effective on ground only. In external view (e.g. shift-8) you can see the spin kit fitted. |
| b21/spin_kit/off | Remove the spin kit from the glider. Command effective on ground only. |
If you can edit a text file using Notepad, you can tweak the instruments to your preferences. The settings file at the base of the aircraft folder, and called USER_SETTINGS.lua. The initial settings in this file are as below. To change the settings, edit the file in any text editor (e.g. Windows Notepad) and save it back to the same location (i.e. <aircraft root folder, normally ASK21_B21>/USER_SETTINGS.lua). Don't mix up your upper- and lower-case letters, keep the file name and the settings names exactly as here.
The file:
-- HERE YOU CAN MODIFY SETTINGS FOR THIS AIRCRAFT

-- UNITS for panel instuments, i.e. feet, meters etc
project_settings.VARIO_UNITS = 0   -- panel display units for variometers (0=knots, 1=m/s)
project_settings.SPEED_UNITS = 0   -- panel display units for air speed indicator (0=knots, 1=km/h)
project_settings.ALTITUDE_UNITS = 0 -- panel display units for altimeter (0=feet, 1=meters)
project_settings.DISTANCE_UNITS = 1 -- panel display units for computer (0=mi, 1=km)

-- VARIOMETER settings
project_settings.QUIET_CLIMB = 100 -- vario climb sound muted below 100 fpm (~1 knot, 0.5 m/s)
project_settings.QUIET_SINK = -150 -- vario sink sound muted above 150 fpm (~1.5 knot, 0.75 m/s)
project_settings.VARIO_VOLUME = 350 -- vario sound volume, set to 0 to mute
project_settings.VARIO_302_MODE = 1 -- initial operating mode for the 302 vario (0=stf, 1=auto, 2=te)
project_settings.VARIO_302_DUAL_SOUND = 0 -- use alternate 'beep' sound for STF mode vs TE mode (=1 to enable)

-- Panel CLOCK instrument - sim time or real time
project_settings.CLOCK_MODE = 0 -- cockpit panel clock display simulator local time (CLOCK_MODE=0)
                                -- simulator Zulu time (CLOCK_MODE = 1)
                                -- or real-world local time (CLOCK_MODE = 2)
| VARIO_UNITS SPEED_UNITS ALTITUDE_UNITS DISTANCE_UNITS |
Each can be set to 0 or 1 to select knots or meters-per-second etc. for instruments that are displaying climb rates, speed, altitude or distance. It is not possible (unless you edit the plugin code) to have the altimeter display height in meters and the GPSNav display height in feet, i.e. the settings are read by all of the instruments and they update accordingly. |
| QUIET_CLIMB QUIET_SINK |
QUIET_CLIMB will be a positive value, where 100 represents 100 feet-per-minute (i.e. 1 knot climb, or 0.5 meters per second) and the vario climb tone will be suppressed BELOW this value. QUIET_SINK will be a NEGATIVE value where -150 represents 150 feet-per-minute sink and the vario sink tone will be suppressed ABOVE this value. The combination of these two values enables you to fly in relaxed peace so long as the computer vario is between these limits. This works particularly well when the vario is in 'speed-to-fly' mode because you can control the position of the needle by flying at the recommended speed or adjusting the Maccready setting to make that the case. |
| VARIO_VOLUME | The initial volume setting for the vario climb/sink tones, setting to zero will mean the sound is initially suppressed. Use values 0..1000 |
| VARIO_302_MODE | The computer vario (aka "302 vario") can switch between "Total Energy" or "Speed-to-Fly" modes, and this setting sets the initial position of the switch. If the setting is 0 (STF) or 2 (TE) then the computer vario will start fixed in that mode and stay there unless the pilot moves the switch during the flight. If 1 (Auto) is selected, then the initial setting will be to auto-switch between the two modes, selecting STF when the glider is cruising in an approximate straight line between thermals, and switching to TE mode as the aircraft circles. |
| VARIO_302_DUAL_SOUND | A setting of 0 will use the SAME climb/sink sounds in TE mode for the slow-down/speed-up sounds in STF mode. A setting of 1 will use similar but different sounds in the two modes as an audio clue of which mode the vario is in. |
| CLOCK_MODE | This is a simple choice whether to display the simulated time (0 means local, 1 means Zulu time) or whether to display your real-world time on the clock on the panel as a handy cue to remember to take the dog for a walk. |