This page isn't a substitute for the detail in the other information provided, it's just a quick summary if you're keen to jump in and fly.
The zip file contains a folder "ASG29_B21" with everything x-plane needs for this aircraft. Copy that folder into <Your X‑Plane Folder>/Aircraft/Extra Aircraft/
Start X-Plane and select the ASG29 B21 from the choice of aircraft. The icon on the select screen can be updated when you fly the ASG29 and use the flight window menu options "Developer" ... "Regenerate Icons for Current Aircraft".
Set suitable weather, i.e. thermals and/or wind blowing towards a slope.
Load a task (X-Plane: .FMS file) via the 'LOAD' button on the Computer Navpanel (you create these in tools like Little Navmap or can download them from others).
Select flap setting "4/A" (using buttons on joystick or keys '1' and '2').
100% water ballast is ok for experienced pilots on aerotow, max 25% for winch. If new to gliding use zero to 25%. Ballast is dumped via the the 'Open' button on the ballast control on the right of the panel. Ballast can be filled (on the ground) via the 'faucet' (GB: 'tap') icon on the ballast control.
The towplane will start towing you as soon as you close the spoilers (X-Plane: speedbrakes) best assigned to joystick axis but default keys '3' and '4'.
Keep wings level on ground run (this can be difficult as you are slow). Once in the air maintain position behind the tow-plane.
Raise the mainwheel (X-Plane: gear) with a joystick button or the 'G' key.
At height (e.g. 2500 feet) release from the towplane with a joystick button or the 'space' key.
Dump ALL the ballast, via the 'Open' button on the ballast control right of panel. 4 minute dump time from full...
Complete downwind circuit of airfield in flap "4/A" or "5T".
Gear DOWN with 'G' key - confirm with gear indicator.
On final approach or before, select "LAND" flap setting. Spoilers at 50%.
Hold off landing as speed decays, reduce spoilers, but do NOT stall onto runway. On ground run keep the stick fully back to prevent a nose-over as long as possible.
Use 75%-100% spoilers to modulate wheel brake. On tarmac reduce braking to avoid nose-over, particularly at the end of the ground run when the elevator will cease working.
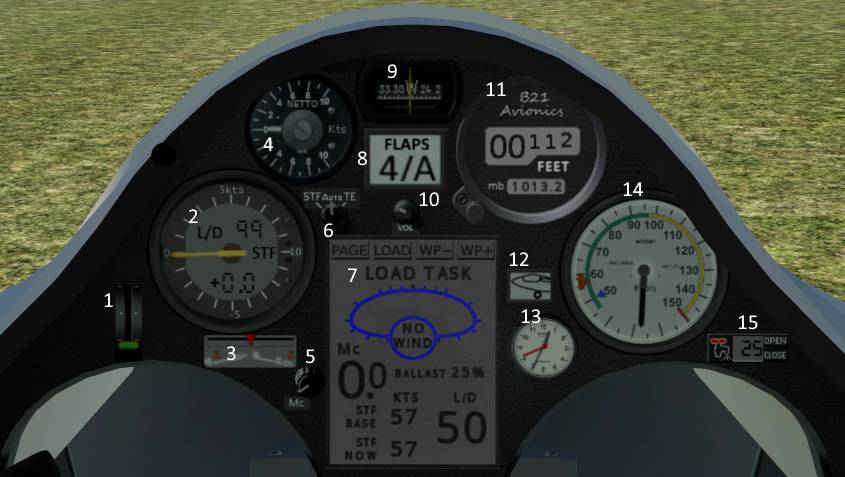
| 1 | Spoilers indicator. Will be green when spoilers closed and locked. The wheel brake is linearly operated when the spoilers are opened between 75% and 100% and on tarmac the wheelbrake is easily strong enough to tip the glider onto its nose. |
| 2 | Computer Vario. Displays compensated rate of climb/sink with beeping audio cue. Compensation mode (Speed-to-fly or Total Energy) set with switch 6, mode displayed at vario center right (STF | TE). Also shows glide ratio (L/D) at top and climb average at bottom. |
| 3 | Trim setting. Controls the hands-off cruising speed of the glider. Set via the '[' and ']' keys or a command can be set to use trigger trim (see commands). Set trim a little forward for take-off and when flying on a strong day. |
| 4 | Netto vario. Displays the air climb/rate outside the glider by deducting the normal sink rate at the current airspeed and ballast setting. |
| 5 | Maccready knob. Pilot sets a value for the generally expected climbrate, on which the computer vario and navpanel will assume speeds to fly and calculate expected arrival heights. E.g. "3.5" knots. The 'V' bug on the airspeed indicator (14) shows the still-air speed-to-fly for the chosen Maccready setting. |
| 6 | Computer Vario mode. Pilot can fix either speed-to-fly or total-energy mode for the computer vario, or leave it in 'Auto' when the instrument will switch to TE when circling, and STF when cruising. |
| 7 | Computer Navpanel. Allows a task to be loaded (LOAD button) and then provides directions and arrival heights to the next and subsequent waypoints. Essential for an efficient final glide 50km or more to the airfield. With no task loaded the information shown is limited. |
| 8 | Flaps and warnings indicator. Shows the current flap setting from 1 (High speed) to LAND (landing). The flap/warning indicator will try and warn you if you open the spoilers with the gear up, or lower the gear while still carrying ballast, or generally seem to be flying around with the gear down. |
| 9 | Compass. |
| 10 | Volume Control. If the vario beep drives you insane, turn it down. User settings are available to adjust the default volume. |
| 11 | Altimeter. Units can be switched feet/metersin user settings. |
| 12 | Gear indicator. Tells you whether main wheel is up (good for flying) or down (good for landing). Gear can be raised during aerotow. |
| 13 | Clock. User settings available for sim time, real time, UTC. |
| 14 | Airspeed indicator. Also has 'speed-to-fly' indicator bugs on the rim. The 'V' indicator is the still-air recommended speed-to-fly based on the Maccready setting. The narrower bug on the rim shows the adjustment to this speed based on rising or falling air outside the aircraft. |
| 15 | Ballast control and indicator. Shows the amount of water ballast in the wings. Faucet/tap symbol can be clicked to fill, open/close buttons control dump valve. 25% ballast is perfectly reasonable for a new pilot, at 100% the glider is a handful at low speed e.g. thermalling and flap control is important (do not fly slowly unless with positive flaps). Dumping 100% ballast takes 4 minutes. Do NOT land with ballast. |