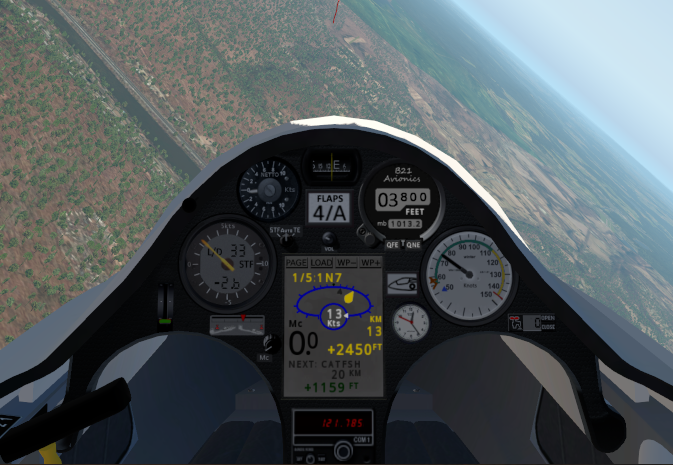
The central large display on the panel provides a variety of navigation information taking into account the speeds the pilot is flying and the ballast being carried. This includes directional pointers, distance to go, and predicted arrival height for the current and next waypoints.
Across the top of the Navpanel are four buttons:

You can create a soaring task using external tools, such as Little navmap or Plan-G. This will produce a .FMS file with the selected waypoints which you store in your <X-Plane base>/Output/FMS plans directory. (Here is an example starting at 1N7 Blairstown USA)
The Navpanel ignores the altitudes in the .FMS file, and uses ground elevations provided by X-Plane instead.
Click the Navpanel LOAD button to select your task (.FMS) file and load it into the Navpanel.
When a task is loaded, the Navpanel will switch to the 'Task' page below, giving the current selected waypoint in yellow at the top of the page, and each waypoint name (e.g. "1N7"), the 'leg' distance from there to the next waypoint, and the elevation of the waypoint.
With no .FMS file loaded, the 'Task' page will simple show the "B21 NAVPANEL" graphic on the left.


This is the default page at startup, and should be the page viewed while soaring. It provides essential soaring navigation information while on a task, i.e. the direction and distance to go to the next two waypoints, and the predicted arrival heights when you get there, taking into account the ballast you are carrying, the speeds you are expected to fly at, your current altitude, the elevation of each waypoint and the current wind. The Navpanel will NOT take into account any high obstructions between you and your destination.
Note your default units for altitude (feet / meters) , distance (miles / kilometers) and speeds (knots / kilometers per hour) can be changed in the USER_SETTINGS file.

The information displayed on the "Nav" page, using the example above, is:
Waypoint number/name |
The waypoint number out of the total waypoints in the task (i.e. "1" of "5"). The waypoint name (i.e. "1N7"). |
Pointers |
The waypoint number out of the total waypoints in the task (i.e. "1" of "5") followed by the waypoint name (i.e. "1N7"). |
Distance to Waypoint |
Distance to the current waypoint (i.e. "1N7") in the selected units (i.e. Kilometers). The units can be changed (miles / km) in User settings. |
Arrival height |
Your predicted height AGL (above ground level) at the waypoint. This simple number is the main point of the Navpanel based on some fairly complex calculations based on the glider performance in the current wind at the current ballast load assuming you are flying at the optimal speed (see speed to fly) for your Maccready setting. When on final glide to your destination, possibly from 50km away, this reading will be all you care about. You will watch the number increasing and decreasing as you progress rather than look out the cockpit... |
Wind |
This shows the wind speed (over the ground) at the current position of the glider. The white triangle shows the direction of the wind relative to the current direction of the glider. In the example illustrated, the glider has a slightly offset tailwind of 14 knots. In general the wind will reduce with altitude but the arrival height calculations always assume the current wind. So a final glide with a tailwind will be slightly optimistically calculated (as the tailwind reduces as you get lower) and a final glide into a headwind will actually be slightly better than you expect for the same reason. The units for wind speed (knots, kilometers per hour) can be changed in User settings. |
Maccready setting |
Maccready setting (pilot estimate of climb rate) see below. This is complex to explain but ultimately simple to use... theoretically it is the pilot input saying how fast the next climb is going to be, so a value such as 3.5 knots or 2 meters per second will often be reasonable. But quite quickly you will learn this exactly equates to how fast you want to fly. If you turn up the dial the speed-to-fly vario will beep at you to fly faster, and the predicted arrival height will get lower. Vice versa if you turn the dial down. |
Next Waypoint |
This is the distance and arrival high for the waypoint after the current one. The Navpanel does the arrival height calculation around the current waypoint to the next one, taking into account everything mentioned above for the current waypoint, plus the change in the wind vector turning from the current waypoint to the next. |

The knob labelled "Mc" in the picture above is used to dial-in a Maccready Setting. This can be interpreted different ways but the simplest is as the expected strength of your next climb. I.e. the setting has the same units as your vario setting, e.g Knots, and the setting is displayed in the two digits the left side of the Navpanel adjacent to the Maccready Knob. Adjusting the setting will affect the speed the computer vario recommends you fly, and the arrival height predicted at your next waypoint.
The computer vario will do many calculations based on how fast you are intending to fly, a simple example being your arrival height at a future waypoint will depend on your sink rate at your planned cruising speed with this being related by the glider polar. This may sound a circular explanation but the vario itself (in Speed-to-Fly mode) will be telling you how fast to fly and the vario assumes reasonably you will be mostly following that guidance. But it uses the pilot input for the expected strength of thermals to calibrate it's recommended speed-to-fly.
The net of all this is the Maccready Setting is the pilot's one communication with the computer vario which then adjusts everything else. The pilot learns pretty quickly that in still air a Maccready setting of, say, 3 knots will give a recommended speed of say 70 knots, or maybe a 4 knot Maccready will recommend 80 knots airspeed. A perfectly normal use of the Maccready setting is for the pilot, with years of experience of how fast they should fly in different weather conditions, to turn the Maccready UP when they want to fly a bit faster or DOWN when they feel they should be cautious. The computer vario will still do all the calculation trickery to continuously adjust the speed appropriately in any lift or sink. (Note the actual speeds in a heavily ballasted racing glider like the ASW27 will be much higher)
The Maccready Setting has a special use on final glide (see below). It is normal for the pilot to fly the course with an optimal cross-country Maccready Setting for the weather, say 3.5 knots, and at some point the arrival height for the finish will become positive (happy news). At this point the pilot is likely to set off for the finish but may still dolphin in thermals and gain a bit of energy on the way so the predicted arrival height continues to improve. At this point the pilot can turn UP the Maccready until that reduces the arrival height to a small margin above the airfield, and then follow the Speed-to-Fly much faster to the finish. The extra speed actually provides a built-in safety margin but only the pilot experience can assess the expected conditions on the way home to judge accurately the risk of landing out.
In Speed-to-Fly mode the variometer behaves like a normal variometer and appears to be indicating lift and sink in a fairly coherent manner, but in fact the lift and sink indications have been fundamentally transformed into a closely related concept (in soaring) that you should SPEED UP or SLOW DOWN. The general optimal practice in soaring is that you SPEED UP IN SINK and SLOW DOWN IN LIFT, and the Speed-to-Fly vario computes the optimum speed to fly given the current lift or sink, compares that to your current speed, and moves the needle and beeps or buuuurps directly according to how much you should speed up or slow down.
This is more complicated to explain than to use in practice - the net effect is a vario that beeps at you to slow down and buuuuuurps at you to speed up, which is kind of what any electronic vario is doing although the STF vario does all this relative to your current airspeed (and in fact how much water ballast you're carrying, which in the ASK21 is zero). The optimal speed for you to fly in still air varies a lot depending on the strength of the next climb you're hoping to get, and this provides the baseline around which the STF vario operates. So you tell the vario your guess of the strength of the next thermal by turning the knob for the Maccready Setting (labelled "Mc" in the picture above).
This is simpler than it sounds - a typical setting might be 3 or 4 knots and you can dial that in and leave it for most of your flight, flying between thermals at the speed the STF vario directs you to. The Maccready setting ultimately becomes a kind of 'confidence' setting - if you're feeling courageous you turn the reading up and the STF will push you to fly faster, using up height at a scary rate but a strong climb will make all that worthwhile.
The computer navpanel above is saying you will arrive 2114 feet above the current waypoint. When you have height in hand the reading will have '+' in front of it. Note that the +/- figures are above the ground at that waypoint and the default units are feet unless you've changed that in your User settings.
The Navpanel provides GPS-based navigation guiding you along a stored flightplan. The Navpanel is continuously doing a very complex calculation taking into account the all-up-weight of the glider (i.e. ballast carried), the wind speed, the glide performance of the ASG29 at that ballast level, the pilot's chosen Maccready setting, the current altitude of the glider and the elevation of the waypoint in order to calculate the expected height the glider will be at when it finally arrives at that waypoint, which could be 30+ miles away.
The calculation from the Navpanel is not a guarantee - it doesn't know what lift and sink you'll fly through to get there, just like you. But it's saying if you fly at the speed indicated on the STF needle and you fly though a reasonable balance of lift and sink, the calculation will be pretty close. With experience you learn how much safety margin to add (or subtract!) from the calculation to avoid ending up in the dirt and winning the competition.
Remember the Maccready setting is telling the computer vario how fast you intend to fly (indirectly by saying how strong you think the thermals will be). So if you turn this UP your arrival height will go DOWN, and vice versa. In other words if your arrival height at the waypoint is below what you'd like it to be, you have the option of turning the Maccready setting down and hence flying more conservatively with a happy effect on your predicted arrival height.
This arrival height is everything during your final glide back to your home airport. From maybe 30 miles away you may climb high enough to have a positive arrival height above your home airfield, at which point you can set sail for home and worry a lot less about finding the next thermal. It is normal to dolphin a fair bit through thermals on the way home so you improve a bit on the calculation, and then maybe 10 miles out you can crank up the Maccready until the arrival height is only a couple of hundred feet and storm home.
A key point is towards the end of a flight you tend to use the Maccready Setting / Arrival Height in reverse i.e. you're watching the arrival height increase from negative to positive (at which point you feel like you are nearly home, even though you could be 50Km+ away) and from then on you may dolphin fly to extract some energy from the lift you fly through but gradually crank up the Maccready setting so the predicted arrival height reduces again to a value that is good enough (say a few hundred feet) but not ridiculously conservative.

There are a few checklists after the Nav and Task pages, e.g. Flaps, Ballast and Landing and Launch checklists. The sequence is intentionally set such that the final checklist page is "Launch" so one press of the "Page" button will bring you back to the "Nav" page which is suitable for the entire flight.